Thomas Becker and I will be speaking at Devoxx, presenting two BOFs: HTTP 2.0/SPDY and Jetty in depth and The Jetty Community BOF.
The first is a more technical session devoted to the internals of SPDY and HTTP 2.0, while the second is more an interactive session about Jetty 9.x new features and improvements (and we have many) with the audience about how people use Jetty, what feature they like most (or least), so it will be fun.
As far as I understand, BOF sessions are free and informal: anyone can attend even if does not have a Devoxx Conference Pass (very interesting if you live in the area).
If you’re attending Devoxx, please stop by even just to say “Hi!” 🙂
See you there !
Blog
-
Speaking at Devoxx 2013
-
Pluggable Transports for Jetty 9.1's HttpClient
In Jetty 9, the
HttpClientwas completely rewritten, as we posted a while back.
In Jetty 9.1, we took one step forward and we made Jetty’sHttpClientpolyglot. This means that now applications can use the HTTP API and semantic (“I want to GET the resource at the http://host/myresource URI”) but can now choose how this request is carried over the network.
Currently, three transports are implemented: HTTP, SPDY and FastCGI.
The usage is really simple; the following snippet shows how to setupHttpClientwith the default HTTP transport:// Default transport uses HTTP HttpClient httpClient = new HttpClient(); httpClient.start();
while the next snippet shows how to setup
HttpClientwith the SPDY transport:// Using the SPDY transport in clear text // Create the SPDYClient factory SPDYClient.Factory spdyClientFactory = new SPDYClient.Factory(); spdyClientFactory.start(); // Create the SPDYClient SPDYClient spdyClient = spdyClientFactory.newSPDYClient(SPDY.V3); // Create the HttpClient transport HttpClientTransport transport = new HttpClientTransportOverSPDY(spdyClient); // HTTP over SPDY ! HttpClient httpSPDYClient = new HttpClient(transport, null); httpSPDYClient.start(); // Send request, receive response ContentResponse response = httpSPDYClient.newRequest("http://host/path") .method("GET") .send();This last snippet allows the application to still use the HTTP API, but have the request and the response transported via SPDY, rather than HTTP.
Why this is useful ?
First of all, more and more websites are converting to SPDY because it offers performance improvements (and if you use Jetty as the server behind your website, the performance improvements can be stunning, check out this video).
This means that with a very simple change in theHttpClientconfiguration, your client application connecting to servers can benefit of the performance boost that SPDY provides.
If you are usingHttpClientfor server-to-server communication, you can use SPDY in clear text (rather than encrypted) to achieve even more efficiency because there is no encryption involved. Jetty is perfectly capable of speaking SPDY in clear text, so this could be a major performance win for your applications.
Furthermore, you can parallelize HTTP requests thanks to SPDY’s multiplexing rather than opening multiple connections, saving network resources.
I encourage you to try out these features and report your feedback here in the comments or on the Jetty mailing list. -
Servlet 3.1 Asynchronous IO and Jetty-9.1
One of the key features added in the Servlet 3.1 JSR 340 is asynchronous (aka non-blocking) IO. Servlet 3.0 introduced asynchronous servlets, which could suspend request handling to asynchronously handle server-side events. Servlet 3.1 now adds IO with the request/response content as events that can be handled by an asynchronous servlet or filter.
The Servlet 3.1 API is available in the Jetty-9.1 branch and this blog shows how to use the API and also some Jetty extensions are shown that further increase the efficiency of asynchronous IO. Finally an full example is given that shows how asynchronous IO can be used to limit the bandwidth used by any one request.
Why use Asynchronous IO?
The key objective of being asynchronous is to avoid blocking. Every blocked thread represents wasted resources as the memory allocated to each thread is significant and is essentially idle whenever it blocks.
Blocking also makes your server vulnerable to thread starvation. Consider a server with 200 threads in it’s thread pool. If 200 requests for large content are received from slow clients, then the entire server thread pool may be consumed by threads blocking to write content to those slow clients. Asynchronous IO allows the threads to be reused to handle other requests while the slow clients are handled with minimal resources.
Jetty has long used such asynchronous IO when serving static content and now Servlet 3.1 makes this feature available to standards based applications as well.
How do you use Asynchronous IO?
New methods to activate Servlet 3.1 asynchronous IO have been added to the ServletInputStream and ServletOutputStream interfaces that allow listeners to be added to the streams that receive asynchronous callbacks. The listener interfaces are WriteListener and ReadListener.
Setting up a WriteListener
To activate asynchronous writing, it is simply a matter of starting asynchronous mode on the request and then adding your listener to the output stream. The following example shows how this can be done to server static content obtained from the ServletContext:
@Override
protected void doGet(HttpServletRequest request, HttpServletResponse response)
  throws ServletException, IOException
{
  // Get the path of the static resource to serve.
  String info=request.getPathInfo();
  // Set the mime type of the response
  response.setContentType(getServletContext().getMimeType(info));
  // Get the content as an input stream
  InputStream content = getServletContext().getResourceAsStream(info);
  if (content==null)
  {
    response.sendError(404);
    return;
  }
  // Prepare the async output
  AsyncContext async = request.startAsync();
  ServletOutputStream out = response.getOutputStream();
  out.setWriteListener(new StandardDataStream(content,async,out));
}
Note how this method does not actually write any output, it simple finds the content and sets up a
WriteListenerinstance to do the actually writing asynchronously.Implementing a WriteListener
Once added to the
OutputStream, theWriteListener methodonWritePossibleis called back as soon as some data can be written and no other container thread is dispatched to handle the request or any async IO for it. The later condition means that the first call toonWritePossibleis deferred until the thread callingdoGetreturns.The actual writing of data is done via the onWritePossible callback and we can see this in the StandardDataStream implementation used in the above example:
private final class StandardDataStream implements WriteListener
{
  private final InputStream content;
  private final AsyncContext async;
  private final ServletOutputStream out;
  private StandardDataStream(InputStream content, AsyncContext async, ServletOutputStream out)
  {
    this.content = content;
    this.async = async;
    this.out = out;
  }
  public void onWritePossible() throws IOException
  {
    byte[] buffer = new byte[4096];
    // while we are able to write without blocking
    while(out.isReady())
    {
      // read some content into the copy buffer
      int len=content.read(buffer);
      // If we are at EOF then complete
      if (len < 0)
      {
        async.complete();
        return;
      }
      // write out the copy buffer.
      out.write(buffer,0,len);
    }
  }
  public void onError(Throwable t)
  {
      getServletContext().log("Async Error",t);
      async.complete();
  }
}
When called, the
onWritePossible()method loops reading content from the resource input stream and writing it to the response output stream as long as the call toisReady()indicates that the write can proceed without blocking. The ‘magic’ comes whenisReady()returns false and breaks the loop, as in that situation the container will callonWritePossible()again once writing can proceed and thus to loop picks up from where it broke to avoid blocking.Once the loop has written all the content, it calls the
AsyncContext.complete()method to finalize the request handling. And that’s it! The content has now been written without blocking (assuming the read from the resource input stream does not block!).Byte Arrays are so 1990s!
So while the asynchronous APIs are pretty simply and efficient to use, they do suffer from one significant problem. JSR 340 missed the opportunity to move away from
byte[]as the primary means for writing content! It would have been a big improvement to add anwrite(ByteBuffer)method toServletOutputStream.Without a ByteBuffer API, the content data to be written has to be copied into a buffer and then written out. If a direct ByteBuffer could be used for this copy, then at least this data would not enter user space and would avoid an extra copies by the operating system. Better yet, a file mapped buffer could be used and thus the content could be written without the need to copy any data at all!
So while this method was not added to the standard, Jetty does provide it if you are willing to down caste to our HttpOutput class. Here is how the above example can be improved using this method and no data copying at all:
protected void doGet(HttpServletRequest request, HttpServletResponse response) throws ServletException, IOException
{
  String info=request.getPathInfo();
  response.setContentType(getServletContext().getMimeType(info));
  File file = new File(request.getPathTranslated());
  response.setContentLengthLong(file.length());
  // Look for a file mapped buffer in the cache
  ByteBuffer mapped=cache.get(path);
  if (mapped==null)
  {
    try (RandomAccessFile raf = new RandomAccessFile(file, "r"))
    {
      ByteBuffer buf = raf.getChannel().map(MapMode.READ_ONLY,0,raf.length());
      mapped=cache.putIfAbsent(path,buf);
      if (mapped==null)
        mapped=buf;
    }
  }
  // write the buffer asynchronously
  final ByteBuffer content=mapped.asReadOnlyBuffer();
  final ServletOutputStream out = response.getOutputStream();
  final AsyncContext async=request.startAsync();
  out.setWriteListener(new WriteListener()
  {
     public void onWritePossible() throws IOException
     {
       while(out.isReady())
       {
         if (!content.hasRemaining())
         {
           async.complete();
           return;
         }
         out.write(content);
      }
      public void onError(Throwable t)
      {
        getServletContext().log("Async Error",t);
        async.complete();
      }
  });
}
Note how the file mapped buffers are stored in a
ConcurrentHashMapcache to be shared between multiple requests. The call toasReadOnlyBuffer()only creates a position/limit indexes and does not copy the underlying data, which is written directly by the operating system from the file system to the network.Managing Bandwidth – Limiting Data Rate.
Now that we have seen how we can break up the writing of large content into asynchronous writes that do not block, we can consider some other interesting use-cases for asynchronous IO.
Another problem frequently associated with large uploads and downloads is the data rate. Often you do not wish to transfer data for a single request at the full available bandwidth for reasons such as:
- The large content is a streaming movie and there is no point paying the cost of sending all of the data if the viewer ends up stopping the video 30 seconds in. With streaming video, it is ideal to send the data at just over the rate that it is consumed by a viewer.
- Large downloads running at full speed may consume a large proportion of the available bandwidth within a data centre and can thus impact other traffic. If the large downloads are low priority it can be beneficial to limit their bandwidth.
- Large uploads or requests for large downloads can be used as part of a DOS attack as they are requests that can consume significant resources. Limiting bandwidth can reduce the impact of such attacks and cost the attacker more resources/time themselves.
We have added the DataRateLimitedServlet to Jetty-9.1 as an example of how asynchronous writes can be slowed down with a scheduler to limit the data rate allocated to any one requests. The servlet uses both the standard
byte[]API and the extended JettyByteBufferAPI. Currently it should be considered example code, but we are planning on developing it into a good utility servlet as Jetty-9.1 is release in the next few months. -
Jetty SPDY push improvements
After having some discussions on spdy-dev and having some experience with our current push implementation, we’ve decided to change a few things to the better.
Jetty now sends all push resources non interleaved to the client. That means that the push resources are being sent sequentially to the client one after the other.
The ReferrerPushStrategy which automatically detects which resources need to be pushed for a specific main resource. See SPDY – we push! for details. Previously we’ve just send the push resources in random order back to the client. However with the change to sequentially send the resources, it’s best to keep the order that the first browser client requested those resources. So we changed the implementation of ReferrerPushStrategy accordingly.
This all aims at improving the time needed for rendering the page in the browser by sending the data to the browser as the browser needs them. -
Jetty SPDY to HTTP Proxy
We have SPDY to SPDY and HTTP to SPDY proxy functionality implemented in Jetty for a while now.
An important and very common use case however is a SPDY to HTTP proxy. Imagine a network architecture where network components like firewalls need to inspect application layer contents. If those network components are not SPDY aware and able to read the binary protocol you need to terminate SPDY before passing the traffic through those components. Same counts for other network components like loadbalancers, etc.
Another common use case is that you might not be able to migrate your legacy application from an HTTP connector to SPDY. Maybe because you can’t use Jetty for your application or your application is not written in Java.
Quite a while ago, we’ve implemented a SPDY to HTTP proxy functionality in Jetty. We just didn’t blog about it yet. Using that proxy it’s possible to gain all the SPDY benefits where they really count…on the slow internet with high latency, while terminating SPDY on the frontend and talking plain HTTP to your backend components.
Here’s the documentation to setup a SPDY to HTTP proxy:
http://www.eclipse.org/jetty/documentation/current/spdy-configuring-proxy.html#spdy-to-http-example-config -
Asynchronous Rest with Jetty-9
This blog is an update for jetty-9 of one published for Jetty 7 in 2008 as an example web application that uses Jetty asynchronous HTTP client and the asynchronoous servlets 3.0 API, to call an eBay restful web service. The technique combines the Jetty asynchronous HTTP client with the Jetty servers ability to suspend servlet processing, so that threads are not held while waiting for rest responses. Thus threads can handle many more requests and web applications using this technique should obtain at least ten fold increases in performance.
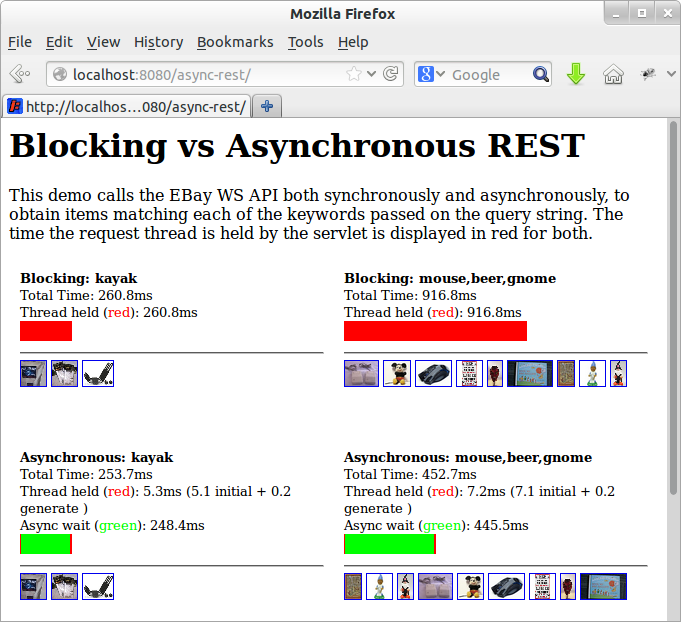
The screen shot above shows four iframes calling either a synchronous or the asynchronous demonstration servlet, with the following results:
- Synchronous Call, Single Keyword
- A request to lookup ebay auctions with the keyword “kayak” is handled by the synchronous implementation. The call takes 261ms and the servlet thread is blocked for the entire time. A server with a 100 threads in a pool would be able to handle 383 requests per second.
- Asynchronous Call, Single Keyword
- A request to lookup ebay auctions with the keyword “kayak” is handled by the asynchronous implementation. The call takes 254ms, but the servlet request is suspended so the request thread is held for only 5ms. A server with a 100 threads in a pool would be able to handle 20,000 requests per second (if not constrained by other limitations)
- Synchronous Call, Three Keywords
- A request to lookup ebay auctions with keywords “mouse”, “beer” and “gnome” is handled by the synchronous implementation. Three calls are made to ebay in series, each taking approx 306ms, with a total time of 917ms and the servlet thread is blocked for the entire time. A server with a 100 threads in a pool would be able to handle only 109 requests per second!
- Asynchronous Call, Three Keywords
- A request to lookup ebay auctions with keywords “mouse”, “beer” and “gnome” is handled by the asynchronous implementation. The three calls can be made to ebay in parallel, each taking approx 300ms, with a total time of 453ms and the servlet request is suspended, so the request thread is held for only 7ms. A server with a 100 threads in a pool would be able to handle 14,000 requests per second (if not constrained by other limitations).
It can be seen by these results that asynchronous handling of restful requests can dramatically improve both the page load time and the capacity by avoiding thread starvation.
The code for the example asynchronous servlet is available from jetty-9 examples and works as follows:- The servlet is passed the request, which is detected as the first dispatch, so the request is suspended and a list to accumulate results is added as a request attribute:
// If no results, this must be the first dispatch, so send the REST request(s) if (results==null) { final Queue - After suspending, the servlet creates and sends an asynchronous HTTP exchange for each keyword:
for (final String item:keywords) { _client.newRequest(restURL(item)).method(HttpMethod.GET).send( new AsyncRestRequest() { @Override void onAuctionFound(Map<String,String> auction) { resultsQueue.add(auction); } @Override void onComplete() { if (outstanding.decrementAndGet()<=0) async.dispatch(); } }); } - All the rest requests are handled in parallel by the eBay servers and when each of them completes, the call back on the exchange object is called. The code (shown above) extracts auction information in the base class from the JSON response and adds it to the results list in the onAuctionFound method. In the onComplete method, the count of expected responses is then decremented and when it reaches 0, the suspended request is resumed by a call to dispatch.
- After being resumed (dispatched), the request is re-dispatched to the servlet. This time the request is not initial and has results, so the results are retrieved from the request attribute and normal servlet style code is used to generate a response:
List
- The example does lack some error and timeout handling.
This example shows how the Jetty asynchronous client can easily be combined with the asynchronous servlets of Jetty-9 (or the Continuations of Jetty-7) to produce very scalable web applications.
-
Jetty, SPDY, PHP and WordPress
Having discussed the business case for Jetty 9 and SPDY, this blog presents a simple tutorial for runing PHP web applications like WordPress on Jetty with SPDY.
Get Jetty
First you’ll need a distribution of Jetty, which you can download, unpack and run with the following (I use wget to download from the command line, or you can just download with a browser from here):
wget -U none http://repo1.maven.org/maven2/org/eclipse/jetty/jetty-distribution/9.0.2.v20130417/jetty-distribution-9.0.2.v20130417.zip
unzip jetty-distribution-9.0.2.v20130417.zip
cd jetty-distribution-9.0.2.v20130417
java -jar start.jar
You can point your browser at http://localhost:8080/ to verify that Jetty is running (Just ctrl-C jetty when you want to stop it).
Configure SPDY
Next you’ll need to download NPN (for SPDY protocol negotiation) from here and save in the lib directory:
wget -O lib/npn-boot-1.1.5.v20130313.jar
-U none
http://repo1.maven.org/maven2/org/mortbay/jetty/npn/npn-boot/1.1.5.v20130313/npn-boot-1.1.5.v20130313.jar
To configure SPDY create the file start.d/spdy.ini with the following content:
--exec
-Xbootclasspath/p:lib/npn-boot-1.1.5.v20130313.jar
OPTIONS=spdy
jetty.spdy.port=8443
jetty.secure.port=8443
etc/jetty-ssl.xml
etc/jetty-spdy.xml
Restart jetty (java -jar start.jar) and you can now verify that you are running SPDY by pointing a recent Chrome or Firefox browser at https://localhost:8443/. You may have to accept the security exception for the self signed certificate that is bundled with the jetty distro. FF indicates that they are using SPDY with a little green lightening symbol in the address bar.
Enable PHP
There are several ways to PHP enable Jetty, but the one I’m using for this demonstration is php-java-bridge, which you can download in a complete WAR file from here. To install and test in a context ready for wordpress:
mkdir webapps/wordpress
cd webapps/wordpress
unzip /tmp/JavaBridgeTemplate621.war
cd ../..
java -jar start.jar
You can then test that PHP is working by browsing to http://localhost:8080/wordpress/test.php and you can test that PHP is working under SPDY by browsing https://localhost:8443/wordpress/test.php.
Install WordPress
You now have a Jetty SPDY server serving PHP, so let’s install WordPress as an example of PHP webapplication. You can download WordPress from here and install it as follows:
cd webapps
rm index.php
unzip /tmp/wordpress-3.5.1.zip
cd ..
java -jar start.jar
You can browse to WordPress at http://localhost:8080/wordpress/ where you should see a screen inviting you to “Create a Configuration File”. You’ll need a MYSQL database instance to proceed and 2 screens later you are running WordPress over HTTP.
You’ll note that if you try immediately to access wordpress with SPDY, you get badly redirected back to the 8080 port with the https protocol! This is just WordPress being a bit dumb when it comes to SSL and I suggest you google WordPress SSL and have a read of some of the configuration and plugin options available. Take special note of how you can easily lock yourself out of the admin pages! Which you will do if you simply update the wordpress URL under general settings to https://localhost:8443/wordpress. You’ll also need to read up on running WordPress on non standard ports, but this is not a blog about wordpress, so I wont go into the options here, other than to say that difficulties with the next few steps are the SPDY as they are for SSL (and that the wordpress guys should really read up on using the host header)! If you want a quick demonstration, just change the home URI in general settings and you’ll be able to see the main site under SPDY at https://localhost:8443/wordpress/, but will be locked out of the admin pages.
Conclusion
That’s it! A few simple steps are all you need to run a complex PHP site under Jetty with SPDY! Of course if you want help with setting this up and tuning it, then please consider the Intalio’s migration, performance and/or production support services.
-
The Need For SPDY and why upgrade to Jetty 9?
So you are not Google! Your website is only taking a few 10’s or maybe 100’s of requests a second and your current server is handling it without a blip. So you think you don’t need a faster server and it’s only something you need to consider when you have 10,000 or more simultaneous users! WRONG! All websites need to be concerned about speed in one form or another and this blog explains why and how Jetty with SPDY can help improve your business no matter how large or small you are!

TagMan conversion rate study for Glasses Direct Speed is Relative
What does it mean to say your web site is fast? There are many different ways of measuring speed and while some websites are concerned with all of them, many if not most need only be concerned with some aspects of speed.
Requests per Second
The first measure of speed that many web developers think about is throughput, or how many requests per second can your web site handle? For large web business with millions of users this is indeed a very important measure, but for many/most websites, requests per second is just not an issue. Most servers will be able to handle thousands of requests per second, which represents 10’s of thousands of simultaneous users and far exceeds the client base and/or database transaction capacity of small to medium enterprises. Thus having a server and/or protocol that will allow even greater requests per second is just not a significant concern for most [ But if it is, then Jetty is still the server for you, but just not for the reasons this blog explains] .
Request Latency
Another speed measure is request latency, which is the time it takes a server to parse a request and generate a response. This can range from a few milliseconds to many seconds depending on the type of the request and complexity of the application. It can be a very important measure for some websites, specially web service or REST style servers that handling a transaction per message. But as an individual measure it is dominated by network latency (10-500 ms) and application processing (1-30000ms), then the time the server spends (1-5ms) handling a request/response is typically not an important driver when selecting a server.
Page Load Speed
The speed measure that is most apparent to users of your website is how long a page takes to load. For a typical website, this involves fetching on average 85 resources (HTML, images, CSS, javascript, etc.) in many HTTP requests over multiple connections. Study summaries below, show that page load time is a metric that can greatly affect the effectiveness of a web site. Page load times have typically been primarily influenced by page design and the server had little ability to speed up page loads. But with the SPDY protocol, there are now ways to greatly improve page load time, which we will see is a significant business advantage regardless of the size of your website and client base.
The Business case for Page Load Speed
The Book Of Speed presents the business benefits of reduced page load speed as determined by many studies summaries below:
- A study at Microsofts live.com found that slowing page loads by 500ms reduced revenue per user by 1.2%. This increased to 2.8% at 1000ms delay and 4.3% at 2000ms, mostly because of a reduced click through rate.
- Google found that the negative effect on business of slow pages got worse the longer users were exposed to a slow site.
- Yahoo found that a slowdown of 400ms was enough to drop the completed page loads by between 5% and 9%. So users were clicking away from the page rather than waiting for it to load.
- AOL’s studied several of its web properties and found a strong correlation between page load time and the number of page view per user visit. Faster sites retained their visitors for more pages.
- When Mozilla improved the speed of their Internet Explorer landing page by 2.2s, they increase their rate of conversions by 15.4%
- Shopzilla reduce their page loads from 6s to 1.2s and increased their sales conversion by 7-12% and also reduced their operation costs due to reduced infrastructure needs.
These studies clearly show that page load speed should be a significant consideration for all web based businesses and they are backed up by many more such as:
- Akamai reveals 2s as the Threshold of Acceptability.
- Gomez Why Web Performance Matters
- QuBit estimate £1.73bn lost in global sales each year due to slow loading speeds.
- Speedprofs reveal the ROI of speed.
If that was not enough, Google have also confirmed that they use page load speed as one of the key factors when ranking search results to display. Thus a slow page can do double damage of reducing the users that visit and reducing the conversion rate of those that do.
Hopefully you are getting the message now, that page load speed is very important and the sooner you do something about it, the better it will be. So what can you do about it?
Web Optimization
The traditional approach to improving has been to look at Web Performance Optimization, to improve the structure and technical implementation of your web pages using techniques including:
- Cache Control
- GZip components
- Component ordering
- Combine multiple CSS and javascript components
- Minify CSS and javascript
- Inline images, CSS Sprites and image maps
- Content Delivery Networks
- Reduce DOM elements in documents
- Split content over domains
- Reduce cookies
These are all great things to do and many will provide significant speed ups. However, most of these techniques are very intrusive and can be at odds with good software engineer; development speed and separation of concerns between designers and developers. It can be a considerable disruption to a development effort to put in aggressive optimization goals along side functionality, design and time to market concerns.
SPDY for Page Load Speed
The SPDY protocol is being developed primarily by Google to replace HTTP with a particular focus on improving page load latency. SPDY is already deployed on over 50% of browsers and is the basis of the first draft of the HTTP/2.0 specification being developed by the IETF. Jetty was the first java server to implement SPDY and Jetty-9 has been re-architected specifically to better handle the multi protocol, TLS, push and multiplexing features of SPDY.
Most importantly, because SPDY is an improvement in the network transport layer, it can greatly improve page load times without making any changes at all to a web application. It is entirely transparent to the web developers and does not intrude into the design or development!
SPDY Multiplexing
One of the biggest contributors to web page load latency is the inability of the HTTP to efficiently use connection. A HTTP connection can have only 1 outstanding request and browsers have a low limit (typically 6) to the number of connections that can be used in parallel. This means that if your page requires 85 resources to render (which is the average), it can only fetch them 6 at a time and it will take at least 14 round trips over the network before the page is rendered. With network round trip time often hundreds of ms, this can add seconds to page load times!
SPDY resolves this issue by supporting multiplexed requests over a single connection with no limit on the number of parallel requests. Thus if a page needs 85 resources to load, SPDY allows all 85 to be requested in parallel and thus only a single round trip latency imposed and content can be delivered at the network capacity.
More over, because the single connection is used and reused, then the TCP/IP slow start window is rapidly expanded and the effective network capacity available to the browser is thus increased.
SPDY Push
Multiplexing is key to reducing round trips, but unfortunately it cannot remove them all because browser has to receive and parse the HTML before it knows the CSS resources to fetch; and those CSS resources have to be fetched and parsed before any image links in them are known and fetch. Thus even with multiplexing, a page might take 2 or 3 network round trips just to identify all the resources associated with a page.
But SPDY has another trick up it’s sleeve. It allows a server to push resources to a browser in anticipation of requests that might come. Jetty was the first server to implement this mechanism and uses relationships learnt from previous requests to create a map of associated resources so that when a page is requested, all it’s associated resources can immediately be pushed and no additional network round trips are incurred.
SPDY Demo
The following demonstration was given and Java One 2012 and clearly shows the SPDY page load latency improvements for a simple page with 25 images blocks over a simulated 200ms network:
How do I get SPDY?
To get the business benefits of speed for your web application, you simply need to deploy it on Jetty and enable SPDY with an SSL Certificate for your site. Standard java web applications can be deployed without modification on Jetty and there are simple solutions to run sites built with PHP, Ruby, GWT etc on Jetty as well.
If you want assistance setting up Jetty and SPDY, why not look at the affordable Jetty Migration Services available from Intalio.com and get the Jetty experts help power your web site.
-
Jetty comes 2nd in Plumbr Usage Analysis!
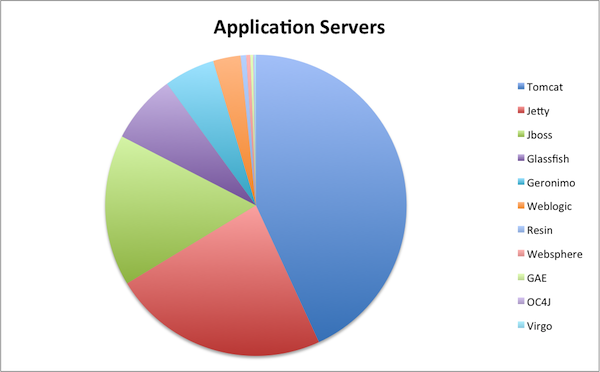
The folks at Plumbr have done some interesting data harvesting from the anonymous phone home data provided by the free version of their memory leak detection system. This has allowed them to determine the most popular application servers from their user base.
From over a 1000 installations they were able to to inspect the classpath in order to look for an application server and then to plot the results they found:
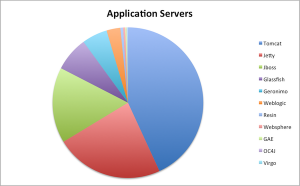
So Tomcat is the expected market leader with 43%, but Jetty comes in a very respectable second with 23% beating Jboss with 16%. Now this is not a hugely scientific study and the results are from a self selected sample of those that are concerned with memory foot print (and hence might be more favourable towards Jetty), but it’s still great to see us up there! -
On JDK 7's asynchronous I/O
I have been working lately with the new JDK 7’s Async I/O APIs (“AIO” from here), and I would like to summarize here my findings, for future reference (mostly my own).
My understanding is that the design of the AIO API aimed at simplifying non-blocking operations, and it does: what in AIO requires 1-5 lines of code, in JDK 1.4’s non-blocking APIs (“NIO” from here) requires 50+ lines of code, and a careful threading design of those.
The context I work in is that of scalable network servers, so this post is mostly about AIO seen from my point of view and from the point of view of API design.
Studying AIO served as a great stimulus to review ideas for Jetty and learn something new.Introduction
Synchronous API are simple:
ServerSocketChannel.accept()blocks until a channel is accepted;SocketChannel.read(ByteBuffer)blocks until some bytes are read, andSocketChannel.write(ByteBuffer)is guaranteed to write everything from the buffer and return only when the write has completed.
With asynchronous I/O (and therefore both AIO and NIO), the blocking guarantee is gone, and this alone complicates things a lot more, and I mean a lot.AIO Accept
To accept a connection with AIO, the application needs to call:
<A> AsynchronousServerSocketChannel.accept(A attachment, CompletionHandler<AsynchronousSocketChannel, ? super A> handler)
As you can see, the
CompletionHandleris parametrized, and the parameters are anAsynchronousSocketChannel(the channel that will be accepted), and a generic attachment (that can be whatever you want).
This is a typical implementation of theCompletionHandlerforaccept():class AcceptHandler implements CompletionHandler<AsynchronousSocketChannel, Void> { public void completed(AsynchronousSocketChannel channel, Void attachment) { // Call accept() again AsynchronousServerSocketChannel serverSocket = ??? serverSocket.accept(attachment, this); // Do something with the accepted channel ... } ... }Note that
Voidit is used as attachment, because in general, there is not much to attach for the accept handler.
But nevertheless the attachment feature is a powerful idea.
It turns out immediately that the code needs theAsynchronousServerSocketChannelreference (see the???in above code snippet) because it needs to callAsynchronousServerSocketChannel.accept()again (otherwise no further connections will be accepted).
Unfortunately the signature of theCompletionHandlerdoes not contain any reference to theAsynchronousServerSocketChannelthat the code needs.
Ok, no big deal, it can be referenced with other means.
At the end it is the application code that creates both theAsynchronousServerSocketChanneland theCompletionHandler, so the application can certainly pass theAsynchronousServerSocketChannelreference to theCompletionHandler.
Or the class can be implemented as anonymous inner class, and therefore will have theAsynchronousServerSocketChannelreference in lexical scope.
It is even possible to use the attachment to pass theAsynchronousServerSocketChannelreference, instead of usingVoid.
I do not like this design of recovering needed references with application intervention; my reasoning is as follows: if the API forces me to do something, in this case callAsynchronousServerSocketChannel.accept(), should not have been better that theAsynchronousServerSocketChannelreference was passed as a parameter ofCompletionHandler.completed(...)?
You will see how this lack is the tip of the iceberg in the following sections.
Let’s move on for now, and see how you can connect with AIO.AIO Connect
To connect using AIO, the application needs to call:
<A> AsynchronousSocketChannel.connect(SocketAddress remote, A attachment, CompletionHandler<Void, ? super A> handler);
The
CompletionHandleris parametrized, but this time the first parameter is forcefullyVoid.
The first thing to notice is the absence of a timeout parameter.
AIO solves the connect timeout problem in the following way: if the application wants a timeout for connection attempts, it has to use the blocking version:channel.connect(address).get(10, TimeUnit.SECONDS);
The application can either block and have an optional timeout by calling
get(...), or can be non-blocking and hope that the connection succeeds or fails, because there is no mean to time it out.
This is a problem, because it is not uncommon that opening a connection takes few hundreds of milliseconds (or even seconds), and if an application wants to open 5-10 connections concurrently, then the right way to do it would be to use a non-blocking API (otherwise it has to open the first, wait, then open the second, wait, etc.).
Alas, it starts to appear that some facility (a “framework”) is needed on top of AIO, to provide additional useful features like asynchronous connect timeouts.
This is a typical implementation of theCompletionHandlerforconnect(...):class ConnectHandler implements CompletionHandler<Void, Void> { public void completed(Void result, Void attachment) { // Connected, now must read ByteBuffer buffer = ByteBuffer.allocate(8192); AsynchronousSocketChannel channel = ??? channel.read(buffer, null, readHandler); } }Like before,
Voidit is used as attachment (it is not evident what I need to attach to a connect handler), so the signature ofcompleted()takes twoVoidparameters. Uhm.
It turns out that after connecting, most often the application needs to signal its interest in reading from the channel and therefore needs to callAsynchronousSocketChannel.read(...).
Like before, theAsynchronousSocketChannelreference is not immediately available from the API as parameter (and like before, the solutions for this problem are similar).
The important thing to note here is that the API forces the application to allocate aByteBufferin order to callAsynchronousSocketChannel.read(...).
This is a problem because it wastes resources: imagine what happens if the application has 20k connections opened, but none is actually reading: it has 20k * 8KiB = 160 MiB of buffers allocated, for nothing.
Most, if not all, scalable network servers out there use some form of buffer pooling (Jetty certainly does), and can serve 20k connection with a very small amount of allocated buffer memory, leveraging the fact that not all connections are active exactly at the same time.
This optimization is very similar to what it is done with thread pooling: in asynchronous I/O, in general, threads are pooled and there is no need to allocate one thread per connection. You can happily run a busy server with very few threads, and ditto for buffers.
But in AIO, it is the API that forces the application to allocate a buffer even if there may be nothing (yet) to read, because you have to pass that buffer as a parameter toAsynchronousSocketChannel.read(...)to signal your interest to read.
All right, 160 MiB is not that much with modern computers (my laptop has 8GiB), but differently from the connect timeout problem, there is not much that a “framework” on top of AIO can do here to reduce memory footprint. Shame.AIO Read
Both accept and connect operations will normally need to read just after having completed their operation.
To read using AIO, the application needs to call:<A> AsynchronousSocketChannel.read(ByteBuffer buffer, A attachment, CompletionHandler<Integer, ? super A> handler)
This is a typical implementation of the
CompletionHandlerforread(...):class ReadHandler implements CompletionHandler<Integer, ReadContext> { public void completed(Integer read, ReadContext readContext) { // Read some byte, process them, and read more if (read < 0) { // Connection closed by the other peer ... } else { // Process the bytes read ByteBuffer buffer = ??? ... // Read more bytes AsynchronousSocketChannel channel = ??? channel.read(buffer, readContext, this); } } }This is where things get really… weird: the application, in the read handler, is supposed to process the bytes just read, but it has no reference to the buffer that is supposed to contain those bytes.
And, as before, the application will need a reference to the channel in order to call againread(...)(to read more data), but that also is missing.
Like before, the application has the burden to pack the buffer and the channel into some sort of read context (shown in the code above using theReadContextclass), and pass it as the attachment (or be able to reference those from the lexical scope).
Again, a “framework” could take care of this step, which is always required, and it is required because of the way the AIO APIs have been designed.
The reason why the number of bytes read is passed as first parameter ofcompleted(...)is that it can be negative when the connection is closed by the remote peer.
If it is non-negative this parameter is basically useless, since the buffer must be available in the completion handler and one can figure out how many bytes were read from the buffer itself.
In my humble opinion, it is a vestige from the past that the application has to read to know whether the other end has closed the connection or not. The I/O subsystem should do this, and notify the application of a remote close event, not of a read event. It will also save the application to always do the check on the number of bytes read to test if it is negative or not.
I sorely missed this remote close event in NIO, and I am missing it in AIO too.
As before, a “framework” on top of AIO could take care of this.
Differently from the connect operation, asynchronous reads may take a timeout parameter (which makes the absence of this parameter inconnect(...)look like an oversight).
Fortunately, there cannot be concurrent reads for the same connection (unless the application really messes up badly with threads), so the read handler normally stays quite simple, if you can bear theifstatement that checks if you read -1 bytes.
But things get more complicated with writes.AIO Write
To write bytes in AIO, the application needs to call:
<A> AsynchronousSocketChannel.write(ByteBuffer buffer, A attachment, CompletionHandler<Integer, ? super A> handler)
This is a naive, non-thread safe, implementation of the
CompletionHandlerforwrite(...):class WriteHandler implements CompletionHandler<Integer, WriteContext> { public void completed(Integer written, WriteContext writeContext) { ByteBuffer buffer = ??? // Decide whether all bytes have been written if (buffer.hasRemaining()) { // Not all bytes have been written, write again AsynchronousSocketChannel channel = ??? channel.write(buffer, writeContext, this); } else { // All bytes have been written ... } } }Like before, the write completion handler is missing the required references to do its work, in particular the write buffer and the
AsynchronousSocketChannelto callwrite(...).
The completion handler parameters provide the number of bytes written, that may be different from the number of bytes that were requested to be written, determined by the remaining bytes at the time
of the call toAsynchronousSocketChannel.write(...).
This leads to partial writes: to fully write a buffer you may need multiple partial writes, and the application has the burden to pack the some sort of write context (referencing the buffer and the channel) like it had to do for reads.
But the main problem here is that this write completion handler is not safe for concurrent writes, and applications – in general – may write concurrently.
What happens if one thread starts a write, but this write cannot be fully completed (and hence only some of the bytes in the buffer are written), and another thread concurrently starts another write ?
There are two cases: the first case happens when the second thread starts concurrently a write while the first thread is still writing, and in this case a WritePendingException is thrown to the second thread; the second case happens when the second write starts after the first thread has completed a partial write but not yet started writing the remaining, and in this case the output will be garbled (will be a mix of the bytes of the two writes), but no errors will be reported.
Asynchronous writes are hard, because each write must be fully completed before starting the next one, and differently from reads, writes can – and often are – concurrent.
What AIO provides is a guard against concurrent partial writes (by throwingWritePendingException), but not against interleaved partial writes.
While in principles there is nothing wrong with this scheme (apart being complex to use), my opinion is that it would have been better for the AIO API to have a “fully written” semantic such thatCompletionHandlers were invoked when the write was fully completed, not for every partial write.
How can you allow applications to do concurrent asynchronous writes ?
The typical solution is that the application must buffer concurrent writes by maintaining a queue of buffers to be written and by using the completion handler to dequeue the next buffer when a write is fully completed.
This is pretty complicated to get right (the enqueuing/dequeuing mechanism must be thread safe, fast and memory-leak free), and it is entirely a burden that the AIO APIs put on the application.
Furthermore, buffer queuing opens up for more issues, like deciding if the queue can have an infinite size (or, if it is bounded, decide what to do when the limit is reached), like deciding the exact lifecycle of the buffer, which impacts the buffer pooling strategy, if present (since buffers are enqueued, the application cannot assume they have been written and therefore cannot reuse them), like deciding if you can tolerate the extra latency due to the permanence of the buffer in the queue before it is written, etc.
Like before, the buffer queuing can be taken care of by a “framework” on top of AIO.AIO Threading
AIO performs the actual reads and writes and invokes completion handlers via threads that are part of a
AsynchronousChannelGroup.
If I/O operations are requested by a thread that is not belonging to the group, it is scheduled to be executed by a group thread, with the consequent context switch.
Compare this with NIO, where there is only one thread that runs the selector loop waiting for I/O events and upon an I/O event, depending on the pattern used, the selector thread may perform the I/O operation and call the application or another thread may be tasked to perform the I/O operation and invoke the application freeing the selector thread.
In the NIO model, it is easy to block the I/O system by using the selector thread to invoke the application, and then having the application performing a blocking call (for example, a JDBC query that lasts minutes): since there is only one thread doing I/O (the selector thread) and this thread is now blocked in the JDBC call, it cannot listen for other I/O events and the system blocks.
The AIO model “powers up” the NIO model because now there are multiple threads (the ones belonging to the group) that take care of I/O events, perform I/O operations and invoke the application (that is, the completion handlers).
This model is flexible and allows the configuration of the thread pool for theAsynchronousChannelGroup, so it is really matter for the application to decide the size of the thread pool, whether to have it bounded or not, etc.Conclusions
JDK 7’s AIO API are certainly an improvement over NIO, but my impression is that they are still too low level for the casual user (lack of remote close event, lack of an asynchronous connect timeout, lack of full write semantic), and potentially scale less than a good framework built on top of NIO, due to the lack of buffer pooling strategies and less control over threading.
Applications will probably need to write some sort of framework on top of AIO, which defeats a bit what I think was one of the main goals of this new API: to simplify usage of asynchronous I/O.
For me, the glass is half empty because I had higher expectations.
But if you want to write a quick small program that does network I/O asynchronously, and you don’t want any library dependency, by all means use AIO and forget about NIO.