SPDY, Google’s web protocol, is gaining momentum. Intending to improve the user’s web experience it aims at severely reducing page load times.
We’ve blogged about the protocol and jetty’s straight forward SPDY support already: Jetty-SPDY is joining the revolution! and SPDY support in Jetty.
No we’re taking this a step further and we push!
SPDY push is one of the coolest features in the SPDY protocol portfolio.
In the traditional http approach the browser will have to request a html resource (the main resource) and do subsequent requests for each sub resource. Every request/response roundtrip will add latency.
E.g.:
GET /index.html – wait for response before before browser can request sub resources
GET /img.jpg
GET /style.css – wait for response before we can request sub resources of the css
GET /style_image.css (referenced in style.css)
This means a single request – response roundtrip for each resource (main and sub resources). Worse some of them have to be done sequentially. For a page with lots of sub resources, the amount of connections to the server (traditionally browsers tend to open 6 connections) will also limit the amount of sub resources that can be fetched in parallel.
Now SPDY will reduce the need to open multiple connections by multiplexing requests over a single connection and does more improvements to reduce latency as described in previous blog posts and the SPDY spec.
SPDY push will enable the server to push resources to the browser/client without having a request for that resource. For example if the server knows that index.html contains a reference to img.jpg, style.css and that style.css contains a reference to style_image.css, the server can push those resources to the client.
To take the previous example:
GET /index.html
PUSH /img.jpg
PUSH /style.css
PUSH /style_image.css
That means only a single request/response roundtrip for the main resource. And the server immediately sends out the responses for all sub resources. This heavily reduces overall latency, especially for pages with high roundtrip delays (bad/busy network connections, etc.).
We’ve written a unit test to benchmark the differences between plain http, SPDY and SPDY + push. Note that this is not a real benchmark and the roundtrip delay is emulated! Proper benchmarks are already in our task queue, so stay tuned. However, here’s the results:
HTTP: roundtrip delay 100 ms, average = 414
SPDY(None): roundtrip delay 100 ms, average = 213
SPDY(ReferrerPushStrategy): roundtrip delay 100 ms, average = 160
Sounds cool? Yes, I guess that sounds cool! 🙂
Even better in jetty this means only exchanging a Connector with another, provide our implementation of the push strategy – done. Yes, that’s it. Only by changing some lines of jetty config you’ll get SPDY and SPDY + push without touching your application.
Have a look at the Jetty Docs to enable SPDY. (will be updated soon on how to add a push strategy to a SPDY connector.)
Here’s the only thing you need to configure in jetty to get your application served with SPDY + push transparently:
<New id=”pushStrategy”>
<Arg type=”List”>
<Array type=”String”>
<Item>.*.css</Item>
<Item>.*.js</Item>
<Item>.*.png</Item>
<Item>.*.jpg</Item>
<Item>.*.gif</Item>
</Array>
</Arg>
<Set name=”referrerPushPeriod”>15000</Set>
</New>
<Call name=”addConnector”>
<Arg>
<New>
<Arg>
<Ref id=”sslContextFactory” />
</Arg>
<Arg>
<Ref id=”pushStrategy” />
</Arg>
<Set name=”Port”>11081</Set>
<Set name=”maxIdleTime”>30000</Set>
<Set name=”Acceptors”>2</Set>
<Set name=”AcceptQueueSize”>100</Set>
<Set name=”initialWindowSize”>131072</Set>
</New>
</Arg>
</Call>
So how do we push?
We’ve implemented a pluggable mechanism to add a push strategy to a SPDY connector. Our default strategy, called ReferrerPushStrategy is using the “referer” header to identify push resources on the first time a page is requested.
The browser will request the main resource and quickly afterwards it usually requests all sub resources needed for that page. ReferrerPushStrategy will use the referer header used in the sub requests to identify sub resources for the main resource defined in the referer header. It will remember those sub resources and on the next request of the main resource, it’ll push all sub resources it knows about to the client.
Now if the user will click on a link on the main resource, it’ll also contain a referer header for the main resource. However linked resources should not be pushed to the client in advance! To avoid that ReferrerPushStrategy has a configurable push period. The push strategy will only remember sub resources if they’ve been requested within that period from the very first request of the main resource since application start.
So this is some kind of best effort strategy. It does not know which resources to push at startup, but it’ll learn on a best effort basis.
What does best effort mean? It means that if the browser doesn’t request the sub resources fast enough (within the push period timeframe) after the initial request of the main resource it’ll never learn those sub resources. Or if the user is fast enough clicking links, it might push resources which should not be pushed.
Now you might be wondering what happens if the browser has the resources already cached? Aren’t we sending data over the wire which the browser actually already has? Well, usually we don’t. First we use the if-modified-since header to identify if we should push sub resources or not and second the browser can refuse push streams. If the browser gets a syn for a sub resource it already has, then it can simply reset the push stream. Then the only thing that has been send is the syn frame for the push stream. Not a big drawback considering the advantages this has.
There has to be more drawbacks?!
Yes, there are. SPDY implementation in jetty is still experimental. The whole protocol is bleeding edge and implementations in browsers as well as the server still have some rough edges. There is already broad support amoung browsers for the SPDY protocol. Stable releases of firefox and chromium/chrome support SPDY draft2 out of the box and it already works really well. SPDY draft 3 however is only supported with more recent builds of the current browsers. SPDY push seems to work properly only with SPDY draft 3 and the latest chrome/chromium browsers. However we’re all working hard on getting the rough edges smooth and I presume SPDY draft 3 and push will be working in all stable browsers soon.
We also had to disable push for draft 2 as this seemed to have negative effects on chromium up to regular browser crashes.
Try it!
As we keep eating our own dog-food, https://www.webtide.com is already updated with the latest code and has push enabled. If you want to test the push functionality get a chrome canary or a chromium nightly build and access our company’s website.
This is how it’ll look in the developer tools and on chrome://net-internals page.
developer-tools (note that the request has been done with an empty cache and the pushed resources are being marked as read from cache):

net-internals (note the pushed and claimed resource count):

Pretty exciting! We keep “pushing” for more and better SPDY support. Improve our push strategy and support getting SPDY a better protocol. Stay tuned for more stuff to come.
Note that SPDY stuff is not in any official jetty release, yet. But most probably will be in the next release. Documentation for jetty will be updated soon as well.
Category: Java
-
SPDY – we push!
-
SPDY support in Jetty
SPDY is Google’s protocol that is intended to improve user experience on the web, by reducing the latency of web pages, sometimes up to a factor of 3. Yes, three times faster.
How does SPDY accomplish that ?
SPDY reduces roundtrips with the server, reduces the HTTP verboseness by compressing HTTP headers, improves the utilization of the TCP connection, multiplexes requests into a single TCP connection (instead of using a limited number of connections, each serving only one request), and allows for server to push secondary resources (like CSS, images, scripts, etc.) associated with a primary resource (typically a web page) without incurring in additional round-trips.
Now, the really cool thing is that Jetty has an implementation of SPDY (see the documentation) in the newly released 7.6.2 and 8.1.2 releases.
Your web applications can immediately and transparently benefit of many of the SPDY improvements without changes, because Jetty does the heavy lifting for you under the covers.
With Chromium/Chrome already supporting SPDY, and Firefox 11 supporting it also (although it needs to be enabled, see how here), more than 50% of the web browsers will be supporting it, so servers needs to catch up, and where Jetty shines.
The Jetty project continues to foster innovation by supporting emerging web protocols: first WebSocket and now SPDY.
A corollary project that came out from the SPDY implementation is a pure Java implementation of the Next Protocol Negotiation (NPN) TLS Extension, also available in Jetty 7.6.2 and 8.1.2.
To prove that this is no fluke, we have updated Webtide’s website with Jetty’s SPDY implementation, and now the website can be served via SPDY, if the browser supports it.
We encourage early adopters to test out Jetty’s SPDY and feedback us on jetty-dev@eclipse.org.
Enjoy ! -
Websocket Example: Server, Client and LoadTest
The websocket protocol specification is approaching final and the Jetty implementation and API have been tracking the draft and is ready when the spec and browsers are available. More over, Jetty release 7.5.0 now includes a capable websocket java client that can be used for non browser applications or load testing. It is fully asynchronous and can create thousands of connections simultaneously.
This blog uses the classic chat example to introduce a websocket server, client and load test.
The project
The websocket example has been created as a maven project with groupid com.example. The entire project can be downloaded from here. The pom.xml defines a dependency on org.eclipse.jetty:jetty-websocket-7.5.0.RC1 (you should update to 7.5.0 when the final release is available), which provides the websocket API and transitively the jetty implementation. There is also a dependency on org.eclipse.jetty:jetty-servlet which provides the ability to create an embedded servlet container to run the server example.
While the project implements a Servlet, it is not in a typical webapp layout, as I wanted to provide both client and server in the same project. Instead of a webapp, this project uses embedded jetty in a simple Main class to provide the server and the static content is served from the classpath from src/resources/com/example/docroot.
Typically developers will want to build a war file containing a webapp, but I leave it as an exercise for the reader to put the servlet and static content described here into a webapp format.
The Servlet
The Websocket connection starts with a HTTP handshake. Thus the websocket API in jetty also initiated by the handling of a HTTP request (typically) by a Servlet. The advantage of this approach is that it means that websocket connections are terminated in the same rich application space provided by HTTP servers, thus a websocket enabled web application can be developed in a single environment rather than by collaboration between a HTTP server and a separate websocket server.
We create the ChatServlet with an init() method that instantiates and configures a WebSocketFactory instance:
public class ChatServlet extends HttpServlet
{
  private WebSocketFactory _wsFactory;
  private final Set _members = new CopyOnWriteArraySet();
  @Override
  public void init() throws ServletException
  {
    // Create and configure WS factory
    _wsFactory=new WebSocketFactory(new WebSocketFactory.Acceptor()
    {
      public boolean checkOrigin(HttpServletRequest request, String origin)
      {
        // Allow all origins
        return true;
      }
      public WebSocket doWebSocketConnect(HttpServletRequest request, String protocol)
      {
         if ("chat".equals(protocol))
           return new ChatWebSocket();
         return null;
      }
    });
    _wsFactory.setBufferSize(4096);
    _wsFactory.setMaxIdleTime(60000);
  }
  ...
The WebSocketFactory is instantiated by passing it an Acceptor instance, which in this case is an anonymous instance. The Acceptor must implement two methods: checkOrigin, which in this case accepts all; and doWebSocketConnect, which must accept a WebSocket connection by creating and returning an instance of the WebSocket interface to handle incoming messages. In this case, an instance of the nested ChatWebSocket class is created if the protocol is “chat”. The other WebSocketFactory fields have been initialised with hard coded buffers size and timeout, but typically these would be configurable from servlet init parameters.
The servlet handles get requests by passing them to the WebSocketFactory to be accepted or not:
  ...
  protected void doGet(HttpServletRequest request,
                       HttpServletResponse response)
    throws IOException
  {
    if (_wsFactory.acceptWebSocket(request,response))
      return;
    response.sendError(HttpServletResponse.SC_SERVICE_UNAVAILABLE,
                       "Websocket only");
  }
  ...
All that is left for the Servlet, is the ChatWebSocket itself. This is just a POJO that receives callbacks for events. For this example we have implemented the WebSocket.OnTextMessage interface to restrict the call backs to only connection management and full messages:
  private class ChatWebSocket implements WebSocket.OnTextMessage
  {
    Connection _connection;
    public void onOpen(Connection connection)
    {
      _connection=connection;
      _members.add(this);
    }
    public void onClose(int closeCode, String message)
    {
      _members.remove(this);
    }
    public void onMessage(String data)
    {
      for (ChatWebSocket member : _members)
      {
        try
        {
          member._connection.sendMessage(data);
        }
        catch(IOException e)
        {
          e.printStackTrace();
        }
      }
    }
  }
The handling of the onOpen callback is to add the ChatWebSocket to the set of all members (and remembering the Connection object for subsequent sends). The onClose handling simply removes the member from the set. The onMessage handling iterates through all the members and sends the received message to them (and prints any resulting exceptions).
The Server
To run the servlet, there is a simple Main method that creates an embedded Jetty server with a ServletHandler for the chat servlet, as ResourceHandler for the static content needed by the browser client and a DefaultHandler to generate errors for all other requests:
public class Main
{
  public static void main(String[] arg) throws Exception
  {
    int port=arg.length>1?Integer.parseInt(arg[1]):8080;
    Server server = new Server(port);
    ServletHandler servletHandler = new ServletHandler();
    servletHandler.addServletWithMapping(ChatServlet.class,"/chat/*");
    ResourceHandler resourceHandler = new ResourceHandler();
    resourceHandler.setBaseResource(Resource.newClassPathResource("com/example/docroot/"));
    DefaultHandler defaultHandler = new DefaultHandler();
    HandlerList handlers = new HandlerList();
    handlers.setHandlers(new Handler[] {servletHandler,resourceHandler,defaultHandler});
    server.setHandler(handlers);
    server.start();
    server.join();
  }
}
The server can be run from an IDE or via maven using the following command line:
mvn
mvn -Pserver exec:exec
The Browser Client
The HTML for the chat room simply imports some CSS and the javascript before creating a few simple divs to contain the chat text, the join dialog and the joined dialog:
<html> <head> <title>WebSocket Chat Example</title> <script type='text/javascript' src="chat.js"></script> <link rel="stylesheet" type="text/css" href="chat.css" /> </head> <body> <div id='chat'></div> <div id='input'> <div id='join' > Username: <input id='username' type='text'/> <input id='joinB' class='button' type='submit' name='join' value='Join'/> </div> <div id='joined' class='hidden'> Chat: <input id='phrase' type='text'/> <input id='sendB' class='button' type='submit' name='join' value='Send'/> </div> </div> <script type='text/javascript'>init();</script> </body> </html>The javascript create a room object with methods to handle the various operations of a chat room. The first operation is to join the chat room, which is triggered by entering a user name. This creates a new WebSocket object pointing to the /chat URL path on the same server the HTML was loaded from:
var room = {
  join : function(name) {
    this._username = name;
    var location = document.location.toString()
      .replace('http://', 'ws://')
      .replace('https://', 'wss://')+ "chat";
    this._ws = new WebSocket(location, "chat");
    this._ws.onopen = this.onopen;
    this._ws.onmessage = this.onmessage;
    this._ws.onclose = this.onclose;
  },
  onopen : function() {
    $('join').className = 'hidden';
    $('joined').className = '';
    $('phrase').focus();
    room.send(room._username, 'has joined!');
  },
  ...
The javascript websocket object is initialised with call backs for onopen, onclose and onmessage. The onopen callback is handled above by switching the join div to the joined div and sending a “has joined” message.
Sending is implemented by creating a string of username:message and sending that via the WebSocket instance:
  ...
  send : function(user, message) {
    user = user.replace(':', '_');
    if (this._ws)
      this._ws.send(user + ':' + message);
  },
  ...
If the chat room receives a message, the onmessage callback is called, which sanitises the message, parses out the username and appends the text to the chat div:
  ...
  onmessage : function(m) {
    if (m.data) {
      var c = m.data.indexOf(':');
      var from = m.data.substring(0, c)
        .replace('<','<')
        .replace('>','>');
      var text = m.data.substring(c + 1)
        .replace('<', '<')
        .replace('>', '>');
      var chat = $('chat');
      var spanFrom = document.createElement('span');
      spanFrom.className = 'from';
      spanFrom.innerHTML = from + ': ';
      var spanText = document.createElement('span');
      spanText.className = 'text';
      spanText.innerHTML = text;
      var lineBreak = document.createElement('br');
      chat.appendChild(spanFrom);
      chat.appendChild(spanText);
      chat.appendChild(lineBreak);
      chat.scrollTop = chat.scrollHeight - chat.clientHeight;
    }
  },
  ...
Finally, the onclose handling empties the chat div and switches back to the join div so that a new username may be entered:
  ...
  onclose : function(m) {
    this._ws = null;
    $('join').className = '';
    $('joined').className = 'hidden';
    $('username').focus();
    $('chat').innerHTML = '';
  }
};
With this simple client being served from the server, you can now point your websocket capable browsers at http://localhost:8080 and interact with the chat room. Of course this example glosses over a lot of detail and complications a real chat application would need, so I suggest you read my blog is websocket chat simpler to learn what else needs to be handled.
The Load Test Client
The jetty websocket java client is an excellent tool for both functional and load testing of a websocket based service. It uses the same endpoint API as the server side and for this example we create a simple implementation of the OnTextMessage interface that keeps track of the all the open connection and counts the number of messages sent and received:
public class ChatLoadClient implements WebSocket.OnTextMessage
{
  private static final AtomicLong sent = new AtomicLong(0);
  private static final AtomicLong received = new AtomicLong(0);
  private static final Set<ChatLoadClient> members = new CopyOnWriteArraySet<ChatLoadClient>();
  private final String name;
  private final Connection connection;
  public ChatLoadClient(String username,WebSocketClient client,String host, int port)
  throws Exception
  {
    name=username;
    connection=client.open(new URI("ws://"+host+":"+port+"/chat"),this).get();
  }
  public void send(String message) throws IOException
  {
    connection.sendMessage(name+":"+message);
  }
  public void onOpen(Connection connection)
  {
    members.add(this);
  }
  public void onClose(int closeCode, String message)
  {
    members.remove(this);
  }
  public void onMessage(String data)
  {
    received.incrementAndGet();
  }
  public void disconnect() throws IOException
  {
    connection.disconnect();
  }
The Websocket is initialized by calling open on the WebSocketClient instance passed to the constructor. The WebSocketClient instance is shared by multiple connections and contains the thread pool and other common resources for the client.
This load test example comes with a main method that creates a WebSocketClient from command line options and then creates a number of ChatLoadClient instances:
public static void main(String... arg) throws Exception
{
  String host=arg.length>0?arg[0]:"localhost";
  int port=arg.length>1?Integer.parseInt(arg[1]):8080;
  int clients=arg.length>2?Integer.parseInt(arg[2]):1000;
  int mesgs=arg.length>3?Integer.parseInt(arg[3]):1000;
  WebSocketClient client = new WebSocketClient();
  client.setBufferSize(4096);
  client.setMaxIdleTime(30000);
  client.setProtocol("chat");
  client.start();
  // Create client serially
  ChatLoadClient[] chat = new ChatLoadClient[clients];
  for (int i=0;i<chat.length;i++)
    chat[i]=new ChatLoadClient("user"+i,client,host,port);
  ...
Once the connections are opened, the main method loops around picking a random client to speak in the chat room
  ...
  // Send messages
  Random random = new Random();
  for (int i=0;i<mesgs;i++)
  {
    ChatLoadClient c = chat[random.nextInt(chat.length)];
    String msg = "Hello random "+random.nextLong();
    c.send(msg);
  }
  ...
Once all the messages have been sent and all the replies have been received, the connections are closed:
  ...
  // close all connections
  for (int i=0;i<chat.length;i++)
    chat[i].disconnect();
The project is setup so that the load client can be run with the following maven command:
mvn -Pclient exec:exec
And the resulting output should look something like:
Opened 1000 of 1000 connections to localhost:8080 in 1109ms
Sent/Received 10000/10000000 messages in 15394ms: 649603msg/s
Closed 1000 connections to localhost:8080 in 45ms
Yes that is 649603 messages per second!!!!!!!!!!! This is a pretty simple easy test, but it is still scheduling 1000 local sockets plus generating and parsing all the websocket frames. Real applications on real networks are unlikely to achieve close to this level, but the indications are good for the capability of high throughput and stand by for more rigorous bench marks shortly.
-
Prelim Cometd WebSocket Benchmarks
I have done some very rough preliminary benchmarks on the latest cometd-2.4.0-SNAPSHOT with the latest Jetty-7.5.0-SNAPSHOT and the results are rather impressive. The features that these two releases have added are:
- Optimised Jetty NIO with latest JVMs and JITs considered.
- Latest websocket draft implemented and optimised.
- Websocket client implemented.
- Jackson JSON parser/generator used for cometd
- Websocket cometd transport for the server improved.
- Websocket cometd transport for the bayeux client implemented.
The benchmarks that I’ve done have all been on my notebook using the localhost network, which is not the most realistic of environments, but it still does tell us a lot about the raw performance of the cometd/jetty. Specifically:
- Both the server and the client are running on the same machine, so they are effectively sharing the 8 CPUs available. The client typically takes 3x more CPU than the server (for the same load), so this is kind of like running the server on a dual core and the client on a 6 core machine.
- The local network has very high throughput which would only be matched by gigabit networks. It also has practically no latency, which is unlike any real network. The long polling transport is more dependent on good network latency than the websocket transport, so the true comparison between these transports will need testing on a real network.
The Test
The cometd load test is a simulated chat application. For this test I tried long-polling and websocket transports for 100, 1000 and 10,000 clients that were each logged into 10 randomly selected chat rooms from a total of 100 rooms. The messages sent were all 50 characters long and were published in batches of 10 messages at once, each to randomly selected rooms. There was a pause between batches that was adjusted to find a good throughput that didn’t have bad latency. However little effort was put into finding the optimal settings to maximise throughput.
The runs were all done on JVM’s that had been warmed up, but the runs were moderately short (approx 30s), so steady state was not guaranteed and the margin of error on these numbers will be pretty high. However, I also did a long run test at one setting just to make sure that steady state can be achieved.
The Results

The bubble chart above plots messages per second against number of clients for both long-polling and websocket transports. The size of the bubble is the maximal latency of the test, with the smallest bubble being 109ms and the largest is 646ms. Observations from the results are:
- Regardless of transport we achieved 100’s of 1000’s messages per second! These are great numbers and show that we can cycle the cometd infrastructure at high rates.
- The long-polling throughput is probably a over reported because there are many messages being queued into each HTTP response. The most HTTP responses I saw was 22,000 responses per second, so for many application it will be the HTTP rate that limits the throughput rather than the cometd rate. However the websocket throughput did not benefit from any such batching.
- The maximal latency for all websocket measurements was significantly better than long polling, with all websocket messages being delivered in < 200ms and the average was < 1ms.
- The websocket throughput increased with connections, which probably indicates that at low numbers of connections we were not generating a maximal load.
A Long Run
The throughput tests above need to be redone on a real network and longer runs. However I did do one long run ( 3 hours) of 1,000,013,657 messages at 93,856/sec. T results suggest no immediate problems with long runs. Neither the client nor the server needed to do a old generation collection and all young generation collections took on average only 12ms.
The output from the client is below:
Statistics Started at Fri Aug 19 15:44:48 EST 2011
Operative System: Linux 2.6.38-10-generic amd64
JVM : Sun Microsystems Inc. Java HotSpot(TM) 64-Bit Server VM runtime 17.1-b03 1.6.0_22-b04
Processors: 8
System Memory: 55.35461% used of 7.747429 GiB
Used Heap Size: 215.7406 MiB
Max Heap Size: 1984.0 MiB
Young Generation Heap Size: 448.0 MiB
- - - - - - - - - - - - - - - - - - - -
Testing 1000 clients in 100 rooms, 10 rooms/client
Sending 1000000 batches of 10x50 bytes messages every 10000 µs
- - - - - - - - - - - - - - - - - - - -
Statistics Ended at Fri Aug 19 18:42:23 EST 2011
Elapsed time: 10654717 ms
	Time in JIT compilation: 57 ms
	Time in Young Generation GC: 118473 ms (8354 collections)
	Time in Old Generation GC: 0 ms (0 collections)
Garbage Generated in Young Generation: 2576746.8 MiB
Garbage Generated in Survivor Generation: 336.53125 MiB
Garbage Generated in Old Generation: 532.35156 MiB
Average CPU Load: 433.23907/800
----------------------------------------
Outgoing: Elapsed = 10654716 ms | Rate = 938 msg/s = 93 req/s =   0.4 Mbs
All messages arrived 1000013657/1000013657
Messages - Success/Expected = 1000013657/1000013657
Incoming - Elapsed = 10654716 ms | Rate = 93856 msg/s = 90101 resp/s(96.00%) =  35.8 Mbs
Thread Pool - Queue Max = 972 | Latency avg/max = 3/62 ms
Messages - Wall Latency Min/Ave/Max = 0/8/135 ms
Note that the client was using 433/800 of the available CPU, while you can see that the server (below) was using only 170/800. This suggests that the server has plenty of spare capacity if it were given the entire machine.
Statistics Started at Fri Aug 19 15:44:47 EST 2011
Operative System: Linux 2.6.38-10-generic amd64
JVM : Sun Microsystems Inc. Java HotSpot(TM) 64-Bit Server VM runtime 17.1-b03 1.6.0_22-b04
Processors: 8
System Memory: 55.27913% used of 7.747429 GiB
Used Heap Size: 82.58406 MiB
Max Heap Size: 2016.0 MiB
Young Generation Heap Size: 224.0 MiB
- - - - - - - - - - - - - - - - - - - -
- - - - - - - - - - - - - - - - - - - -
Statistics Ended at Fri Aug 19 18:42:23 EST 2011
Elapsed time: 10655706 ms
	Time in JIT compilation: 187 ms
	Time in Young Generation GC: 140973 ms (12073 collections)
	Time in Old Generation GC: 0 ms (0 collections)
Garbage Generated in Young Generation: 1652646.0 MiB
Garbage Generated in Survivor Generation: 767.625 MiB
Garbage Generated in Old Generation: 1472.6484 MiB
Average CPU Load: 170.20532/800
Conclusion
These results are preliminary, but excellent none the less! The final releases of jetty 7.5.0 and cometd 2.4.0 will be out within a week or two and we will be working to bring you some more rigorous benchmarks with those releases.
-
Jetty with Spring XML
Since the very beginning, Jetty has been IOC friendly and thus has been able to be configured with spring. But the injecting and assembling the jetty container is not the only need that Jetty has for configuration and there are several other configuration files (eg contexts/yourapp.xml, jetty-web.xml, jetty-env.xml) that have needed to be in the Jetty XML configuration format.
With the release of Jetty-7.4, the jetty-spring module has been enhanced with and XmlConfiguration Provider, so now anywhere there is a jetty xml file can be replaced with a spring XML file, so that an all spring configuration is now possible. [ But note that there is no plan to use spring as the default configuration mechanism. For one, the 2.9MB size of the spring jar is too large for Jetty’s foot print aspirations (currently only 1.5MB for everything) ].
Starting with spring Jetty
First you will need a download of jetty-hightide, that includes the spring module:
wget --user-agent=other http://repo2.maven.org/maven2/org/mortbay/jetty/jetty-hightide/7.4.0.v20110414/jetty-hightide-7.4.0.v20110414.tar.gz
tar xfz jetty-hightide-7.4.0.v20110414.tar.gz
jetty-hightide-7.4.0.v20110414/
You then need to augment this with a spring jar and commons logging:
cd lib/spring
wget --user-agent=other http://repo2.maven.org/maven2/org/springframework/spring/2.5.6/spring-2.5.6.jar
wget --user-agent=other http://repo2.maven.org/maven2/commons-logging/commons-logging/1.1.1/commons-logging-1.1.1.jar
cd ../..
and then add spring to the Jetty options by editing start.ini and adding “spring” to the OPTIONS set there:
OPTIONS=Server,jsp,jmx,resources,websocket,ext,jta,plus,jdbc,annotations,spring
and that’s it! Jetty is now ready to be configured with spring
Example Jetty XML
We can now replace the main etc/jetty.xml file with a spring version as follows:
Note that Server bean is given the name (or alias) of “Main” to identify it as the primary bean configured by this file. This equates to the Configure element of the Jetty XML format. Note also that both the Server and Contexts ids are used by subsequent config files (eg etc/jetty-deploy) to reference the beans created here and that the ID space is shared between the configuration formats. Thus you can mix and match configuration formats.
Example Context XML
As another example, you can replace the contexts/test.xml file with a spring version as follows:
        www.myVirtualDomain.com
        localhost
        127.0.0.1
Note that unlike jetty XML, spring does not have a GET element that allows a bean to be obtained from another bean and then configured. So the structure of this context file is somewhat different to the corresponding jetty xml file.
Running Spring Jetty
Running spring jetty is now exactly as for normal jetty:
java -jar start.jar
This uses the start.ini file and the lib directory to construct a classpath and to execute the configuration files specified (including the jetty.xml we have converted to spring). Use
java -jar start.jar --helpto learn more about the jetty start mechanism.Of course, with spring, you can also start jetty by running spring directly and using a more spring-like mechanism for aggregating multiple configuration files.
Conclusion
While spring and jetty XML are roughly equivalent, they each have their idiosyncrasies. The Jetty API has been developed with the jetty XML format in mind, so if you examine the full suite of Jetty XML files, you will see Getters and methods calls used to configure the server. These can be done in spring (AFAIN using helper classes), but it is a little more clunky than jetty XML. This can be improved over time by a) having spring config files written by somebody more spring literate than me; b) improving the API to be more spring friendly; c) adapting the style of configuration aggregation to be more spring-like. I’m receptive to all three and would welcome spring users to collaborate with to improve the all spring configuration of jetty.
-
Jetty WTP Adaptor
Not too long ago we had a contribution from Angelo Zerr that gave jetty a native WTP adaptor. We are happy to announce its availability now!
Shockingly, there is some documentation for this plugin, based on the original documentation provided by Angelo…it was a model contribution, code _and_ docs.
Jetty WTP Plugin Documentation
The documentation contains installation instructions and we’ll have it available through the WTP Server Adaptor discovery mechanism soon hopefully.
The plugin itself is largely based off of the tomcat version of the plugin with an addition of a websocket wizard of Angelo’s.
Feedback on the plugin is welcome and we have a bugzilla component ‘wtp’ for the plugin which I encourage people to report issues to.
Bugzilla
We plan to add additional versions of the runtime over time and keep it up to date with the latest jetty releases -
CometD 2 Annotated Services
A new feature that has been recently added to the upcoming CometD 2.1.0 release is
the support for annotated services, both on server side and on client side.Services are the heart of a CometD application, because allow to write business logic that is executed when a message
arrives on a particular channel.
For example, in chat applications when a new member joins a chat room, the chat room’s members list is broadcasted to all
existing chat room members.This is how an annotated service looks like:
@Service("echoService")
public class EchoService
{
    @Inject
    private BayeuxServer bayeux;
    @Session
    private ServerSession serverSession;

    @PostConstruct
    public void init()
    {
        System.out.println("Echo Service Initialized");
    }

    @Listener("/echo")
    public void echo(ServerSession remote, ServerMessage.Mutable message)
    {
        String channel = message.getChannel();
        Object data = message.getData();
        remote.deliver(serverSession, channel, data, null);
    }
}
Annotations are great because they carry a semantic meaning to their annotation target.
Even if you have not written a CometD service before, the code above is pretty straightforward, and it is easy
to understand that theecho()method is invoked when a message arrives on the "/echo" channel.Annotated services also reduce the amount of boilerplate code, especially on client side, where it is typical
to add listeners and subscribers as anonymous inner classes.Compare:
bayeuxClient.getChannel(Channel.META_CONNECT).addListener(new ClientSessionChannel.MessageListener()
{
    public void onMessage(ClientSessionChannel channel, Message message)
    {
        // Connect handling...
    }
});
with:
@Listener(Channel.META_CONNECT)
public void metaConnect(Message connect)
{
    // Connect handling...
}
I find the second version much more readable, and since code is much more read than written, this is a fine improvement.
Lastly, CometD annotated services leverage the standard annotations for dependency injection and lifecycle management,
and therefore integrate nicely with Spring 3.x.Take a look at the annotated services documentation
and to the CometD 2 Spring integration for details.Enjoy !
-
Lies, Damned Lies and Benchmarks
Benchmarks like statistics can be incredibly misleading in ways that are only obvious with detailed analysis. Recently the apache HTTPCore project released some benchmark results whose headline results read as:
Jetty
HttpCore
Linux BIO
35,342
56,185
Linux NIO
1,873
25,970
Windows BIO
31,641
29,438
Windows NIO
6,045
13,076
Looking at these results, you see that HttpCore has better throughput in all scenarios except bocking IO running on windows. More importantly, for Linux NIO the performance of Jetty is an order of magnitudes behind HttpCore!!
So is HttpCore really an faster than Jetty and does Jetty NIO suck? For this particular benchmark, the answer is obviously YES and YES. But the qualification “for this particular benchmark” is very important, since this benchmark is setup to places a huge penalty on the kind of latency that jetty uses to dispatch requests. Normally latency can be traded off for throughput, but with this benchmark, adding 2ms of latency to a request is the difference between 56,000 requests/sec and 8000 requests/sec. Jetty makes frequent latency vs throughput tradeoffs, is thus is severly penalized by this benchmark.
[Note that I’m not saying the HttpCore team have done anything wrong and the “Lie, Damned Lies” head line is only a joking reference to the Mark Twain quote about the power of numbers to show almost anything. Our own benchmarks are biases towards our own sweet spots. This blog seeks only to explain the reasons for the results and not to criticize the HttpCore team].HTTP
Server Throughput LimitsTypically the throughput of a server is going to be limited by the minimum of one of the following factors:
Network Bandwidth Limitations
The total network capacity may limit the maximum throughput. If each response is 10KB in size and the network is only capable of 10MB/s, then 1024 requests per second will saturate that benchmark. The HttpCore benchmark used 2048B messages of the localhost network, which essentially has no maximum throughput. So for the modelling of this benchmark, I have assumed a GB network, which would have a potential maximum through put of 524288 requests/sec, if it is not limited by other factors.
CPU Limitations
The number of request that can be processed may be limited by the available CPU power. If each request took 2ms of CPU time to process, then each CPU could only handle 500 requests per second. For the HttpCore benchmark, they had a 4 CPU box and they have very simple/efficient request handling that took less than 0.018ms per request, which results in potential maximum throughput of 4*1000/0.018 = 222,222 requests/sec, if
it is not limited by other factors.Connection Limitations
HTTP typically has 1 request outstanding per connection (except when pipelines are used (rarely)), thus the maximal throughput of the server may be limited by the sum of the maximal throughput of each connection. The maximal throughput of a HTTP connection is mostly governed by the round trip time of each request, for example if each request takes 10ms in it’s round trip, then a connection can only handle 100 requests per second. The HttpCore benchmark has requests that take 0.45ms round trip on 25 connections, which results in a potential maximum throughput of 25*1000/0.45ms = 56180 requests/second.
HttpCore Throughput Limitation
It can be seen from the analysis above that the HttpCore benchmark throughput is the limited at 56180 requests/second by the number connections and the round trip time of a request over each connection. More importantly, this limit is numerically sensitive to the specific values chosen for the number of connections and latency. The following chart shows the minimum of the 3 limitations for the HttpCore benchmark against the number of connections and additional request latency (either in network or the server):
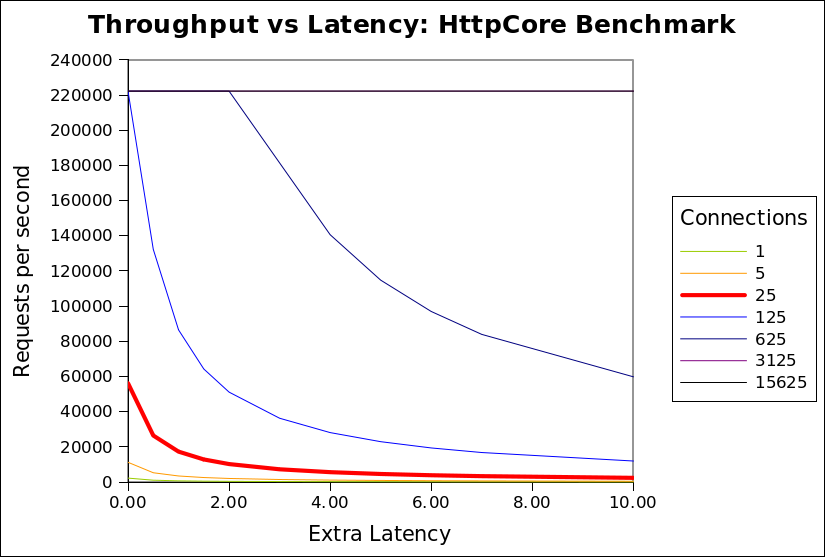
CPU’s 4 CPU time per request (ms) 0.018 Network latency (ms) 0.427 Max requests/s by CPU 222222 Request size 2048 Network bandwidth (MB) 1024 Max requests/s by bandwidth 524288 It can be seen that the network bandwidth limitation (524288/s) is never the limiting factor. The CPU limitation (222222/s) is only applicable once the number of connections
exceeds 125. At the 25 connections used by the HttpCore benchmark, it can be seen that any extra latency results in a rapid reduction in throughput from almost 60000/s to less than 2000/s.The benchmark puts both Jetty and HttpCore on the red (25 connection) curve, but HttpCore is on the absolute left hand side of the curve, while jetty is a few ms of latency to the right. Thus jetty, which uses extra latency (for good reasons described below), is heavily punished by this benchmark, because the benchmark happens to be on one of the steepest sections of that graph (although it looks like it could be worse at 125 connections, but I expect some other limitation would prevent HttpCore reaching 222222/s).
Realistic Throughput limitations
The configuration of the HttpCore benchmark do not well match the reality faced by most HTTP servers for which throughput is a concern. Specifically:
- The localhost network has less than 1ms of round trip latency, when real internet applications must expect at least 10s if not 100s of ms of network latency.
- A modern browser will open 6 connections to the same host, so 25 connections represent only 4 simultaneous users. The expectation for a loaded HTTP server is that it will see at least 100s if not 1000s of simultaneous connections.
- Real connections are mostly idle and will hardly ever see a new request <1ms after a response is sent.
- Java webservers are typically used for dynamic pages that will take more that 0.018ms to generate. If the CPU time per request is increased to 0.15ms per request, then the CPU Limitation is reduced to 26667/s.
The chart below is updated with these more realistic assumptions:
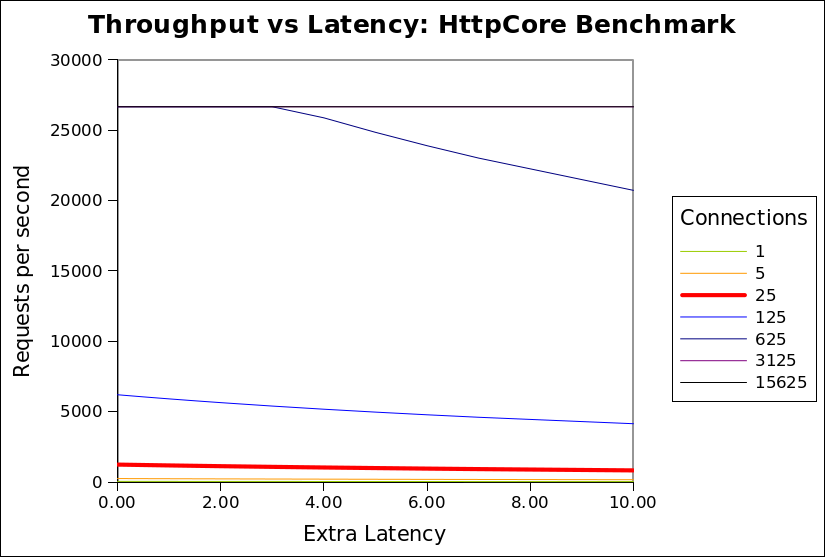
CPU’s 4 CPU time per request (ms) 0.150 Network latency (ms) 20.000 Max requests/s by CPU 26667 Request size 2048 Network bandwidth (MB) 100 Max requests/s by bandwidth 51200 This shows that when realistic assumptions are applied, the throughput is far less sensitive to additional latency. Above a 500 connections, the throughput is rapidly limited by available CPU and is unaffected by any extra latency in the handling of each request. Even at 125 connections, extra latency only slightly reduces throughput. This shows that there is little or no cost associated with increased latency and thus a server can consider using extra latency if it has a good reason to (see below).
I invite you to download the spreadsheet used to generate these graphs and experiment with the assumptions, so that you can see that in many (if not most) scenarios, that throughput is not significantly sensitive to latency. It is only with the specific assumptions used by HttpCore that latency is a sensitive parameter.Why use Latency?
I have demonstrated that in realistic scenarios (with many connections and some network latency), then additional latency in handling a request should not have a significant impact on throughput. So why does Jetty have a higher latency per request than HttpCore?
The HttpCore NIO server as configured for the benchmark used a single thread per CPU core, each allocated to a select set terminating a proportion of the connections. Each thread reads a request, writes the response and then loops back to the select set, looking for a the next connection to read the next available request. This is very efficient, but only if all requests can be handled without blocking. If the handling the request blocks for any reason (eg writing response to slow client, waiting for DB, waiting for a synchronize lock, etc) then all the other requests from the same select set will also be blocked and throughput will be greatly reduced. For a 4 CPU machine, it would only take 4 slow clients or 4 long DB queries to block the entire server and prevent any requests from being handled. The HttpCore benchmark avoids this situation by having simple non blocking requests handlers and no slow clients, networks or databases etc.
It is unacceptable in most real HTTP deployments to allow one request to block unrelated requests due to thread starvation. Thus most HTTP servers operate with at thread pool and dispatch the handling of each request to different thread from that handling the NIO select set. Since each request is handled in a dedicated thread, then it may block without affecting other requests or reducing the throughput of the server.
When a request is dispatched to a thread pool, it typically waits for a few ms in a job queue for a thread to be allocated to handle the request. For most realistic scenarios this extra latency has little or no cost and significant benefit, but in the HttpCore benchmark this latency is heavily penalized as it delays the response, thus it delays the load generator sending the next request. Throughput is reduced because the client sends less requests, not because the server cannot handle them.
Also the benchmark compared the raw HTTP components of HttpCore vs the rich servlet environment of Jetty. Jetty will consume some extra CPU/latency to establish the servlet context which provides many benefits of functionality to the application developer. Jetty could also be configured as a simple HTTP handler and would thus use both less CPU and less latency.Conclusion
The HttpCore benchmark is essentially comparing apples with oranges. The benchmark is setup to mostly measure the raw speed of the HttpCore HTTP parsing/generating capabilities. and does not represent a realistic load test. The Jetty configuration used has been optimized to be a general purpose application server and HTTP server for large numbers of mostly idle connections. Given this disparity, I think it is great that Jetty was
able to able to achieve similar and sometimes better performance in some of the scenarios. This shows that Jetty’s own HTTP parsing/generation is no slouch and that it would be interesting to compare jetty if it was stripped of it’s thread pool and servlet container. If we find the time we may provide such a configuration.
For anybody that really wants to know which server would be faster for them (and the different feature sets do not guide their selection), then they need to setup their own benchmark with a load generator that will produce a traffic profile as close as possible to what their real application will experience. -
CometD 1.0 Released
The CometD project has finally released its 1.0 version !
I have already posted here about new features of the CometD project, but the 1.0 release is a further step forward in usability, stability and documentation.
For those of you that did not hear about the CometD project, it is a project that implements the Bayeux protocol to provide two-way seamless HTTP communication, from clients to server and from server to clients.
Any application that receives server-side events such as online games, online chats, online stock information, online sport results, online bet results, online content sharing, online social networking and so on is a potential perfect application that can use the libraries provided by the CometD project to greatly simplify development.
An event arrives on the server, and it is communicated to the clients with minimal latency via HTTP (and of course through firewalls, proxies, and more generally "through the web").
Such applications are generally dubbed as comet web applications (and you can read here who and when the term was coined).
The CometD project ships the following libraries to develop comet web applications:
- A JavaScript library, with bindings for the well known Dojo and jQuery toolkits
- A Java client library, to be used, for example, in rich Java clients such as Swing applications
- A Java server library, to be used to implement the logic behind you application
There are also alpha version of Perl and Python libraries, and you can find more implementations at this page.
Greg already blogged about the cool features of the CometD project, but I would like to emphasize how simple is to create your first comet web application with CometD, using Maven:
$ mvn archetype:generate -DarchetypeCatalog=http://cometd.org
...
$ mvn install jetty:run
Two lines, that’s it, and the detailed guidance of the CometD primer.
You don’t need to download and install anything, you can just start with the CometD primer, and you are ready.
After that, you can import the Maven project into your favorite IDE, and use the Jetty Plugin to develop-deploy instantaneously.The documentation has much improved, and now covers the 3 major libraries shipped, in details.
Add to that How-Tos and FAQs, and a completely searchable website, so that you can enter your query (try "howtos") and have the documentation page that refers to your search.Do you use Spring for your server side plumbing ?
There are detailed instructions of how to integrate with Spring.The CometD project is a 1.0 release, but has already been deployed in many applications that range from few users to a potential of million of users, and proved to scale really well. No worries on this side, <shameless-plug>especially when you can have a company that backs you up</shameless-plug>.
Enjoy !
-
Jetty @ Eclipse – 7.0.0.M0
I am pleased to announce the availability of the first milestone build of jetty7 @ eclipse!
Download Jetty 7.0.0.M0!
It has been a crazy few weeks getting all of this together but it finally happened and we crossed a big initial hurdle in our efforts to move through incubation. We are still in the parallel ip verification process which is proceeding well, as expected. The process of getting accustomed to bugzilla and the eclipse infrastructure is also chugging along and as our milestone builds progress we will slowly enable more functionality to the eclipse community. Things like update sites and increased support for osgi are all coming over the next months.
Best make one quick note in case folks are not aware, with the delaying of the servlet 3.0 spec we are altering the development path for jetty7 and dropping support for the 3.0 api and instead jetty7 is the initial release of jetty that has org.eclipse package changes, a base jdk requirement of java5 and other improvements that you will hear about as they crop up. Jetty8 will be the first version of jetty that will support the servlet 3.0 api and builds of that will be available as well soon.
Lastly, I would like to give a quick thanks to the folks within the Eclipse Foundation that have helped us immeasurably to get to this point.
[edit]
I would be remiss to not note to our maven brethren that the location of jetty artifacts has changed within the central maven repository.Maintenance releases of Jetty6 will still remain in the org/mortbay/jetty location within the central repository. In fact jetty 6.1.16 was released today and is available.


