HTTP/2 is now the official RFC 7540, and it’s about time to deploy your website on HTTP/2, to get the numerous benefits that HTTP/2 brings.
A very typical deployment is to have Apache (or Nginx) working as a reverse proxy to a Servlet Container such as Jetty or Tomcat.
This configuration cannot be used for HTTP/2, because Apache does not support yet HTTP/2 (nor does Nginx).
We want to propose an alternative deployment replacing Apache (or Nginx) with HAProxy, so that we can leverage Jetty’s 9.3.0 HTTP/2 support, and retain most if not all the features that Apache (or Nginx) were providing as reverse proxy.
For those that don’t know HAProxy, it’s a very fast load balancer and proxy that powers quite a number of the world’s most visited sites, see here.
What you will get is a very efficient TLS offloading (performed by HAProxy via OpenSSL), and Jetty HTTP/2 support, including HTTP/2 Push.
The setup to make HAProxy + Jetty + HTTP/2 work is fairly simple, and documented in detail here.
Don’t wait years to update your website to HTTP/2: whether you run a JEE web application, or a PHP application like WordPress, HAProxy and Jetty can speed up your website considerably, and many studies have shown that this results in more business.
Browsers like Firefox and Chrome already support HTTP/2, so you will get more than half of the world potentially accessing your website with HTTP/2.
Contact us if you want to know more about HTTP/2 and how we can help you to speed up your website.
Category: HTTP
-
HTTP/2 with HAProxy and Jetty
-
Jetty HTTP/2 cleartext upgrade
With the approach of the release candidate for Jetty 9.3.0 in the next days, we have implemented support for HTTP/2 cleartext upgrade mechanism, on server side, resolving issue #465857.
This means that you can configure a Jetty server to speak cleartext HTTP/1.1 and cleartext HTTP/2 on the same server port.
This feature is mostly useful for server data centers, where nodes communicate with each other via HTTP/2 using a Java client (for example Jetty’s HttpClient using the HTTP/2 transport) because you want to leverage the HTTP/2 protocol advantages, in particular multiplexing, for a more efficient communication.
This scenario is typical for microservices deployed using embedded Jetty (just run them viajava -jar my_microservice.jar) or, in general, for HTTP services (REST or similar) that reside on different nodes and that are coordinated by a façade service.
In such scenario, the Java client knows before hand that the server port it is connecting to speaks HTTP/2, so the server needs to be configured to speak cleartext HTTP/2 on that port.
However, it is also common during development/troubleshooting of REST services to point a browser to a particular node, craft the right URL with the expected path and/or query parameters, and obtain back the result of the processing (or the error) of your service request.
But browsers don’t speak cleartext HTTP/2 (at the time of this blog, no browser is supporting cleartext HTTP/2, neither directly nor via the standard HTTP/1.1 upgrade mechanism to a different protocol, and there are no known plans for browsers to support this feature in the future), so they will speak HTTP/1.1 to a server port that is configured to speak HTTP/2.
Before the implementation of issue #465857, this scenario resulted in a communication failure between the browser and the server.
Sure, you can configure two different ports, one that speaks HTTP/2 for Java clients, and one that speaks HTTP/1.1 for browsers, but that is cumbersome.
With the resolution of issue #465857, you can now configure Jetty to speak HTTP/1.1 and HTTP/2 on the same server port:public static void main(String[] args) throws Exception { // The Jetty Server. Server server = new Server(); // Common HTTP configuration. HttpConfiguration config = new HttpConfiguration(); // HTTP/1.1 support. HttpConnectionFactory http1 = new HttpConnectionFactory(config); // HTTP/2 cleartext support. HTTP2CServerConnectionFactory http2c = new HTTP2CServerConnectionFactory(config); ServerConnector connector = new ServerConnector(server, http1, http2c); connector.setPort(8080); server.addConnector(connector); // Here configure contexts / servlets / etc. server.start(); }If a browser speaking HTTP/1.1 connects to the server, Jetty will speak HTTP/1.1.
If a Java client speaking HTTP/2 connects to the server, Jetty will detect that and internally upgrade the connection from HTTP/1.1 to HTTP/2, so that the Java client will benefit of the HTTP/2 protocol advantages.
Jetty also supports the standard HTTP/1.1 upgrade mechanism (on the server side, not yet onHttpClient), so that if you are using tools likenghttpyou will be able to speak to a Jetty server either using directly HTTP/2, or by sending a HTTP/1.1 upgrade request to HTTP/2:# Direct HTTP/2 $ nghttp -v http://localhost:8080/ # Upgrade from HTTP/1.1 to HTTP/2 $ nghttp -vu http://localhost:8080/
If you are interested in how you can benefit from HTTP/2, contact Webtide, and you will have all our expertise at your hands.
-
Eat What You Kill
A producer consumer pattern for Jetty HTTP/2 with mechanical sympathy
Developing scalable servers in Java now requires careful consideration of mechanical sympathetic issues to achieve both high throughput and low latency. With the introduction of HTTP/2 multiplexed semantics to Jetty, we have taken the opportunity to introduce a new execution strategy, named “eat what you kill”[n]The EatWhatYouKill strategy is named after a hunting proverb in the sense that one should only kill to eat. The use of this phrase is not an endorsement of hunting nor killing of wildlife for food or sport.[/n], which is: avoiding dispatch latency; running tasks with hot caches; reducing contention and parallel slowdown; reducing memory footprint and queue depth.
The problem
The problem we are trying to solve is the producer consumer pattern, where one process produces tasks that need to be run to be consumed. This is a common pattern with two key examples in the Jetty Server:
- a NIO
Selectorproduces connection IO events that need to be consumed - a multiplexed HTTP/2 connection produces HTTP requests that need to be consumed by calling the Servlet Container
For the purposes of this blog, we will consider the problem in general, with the producer represented by following interface:
public interface Producer
{
    Runnable produce();
}
The optimisation task that we trying to solve is how to handle potentially many producers, each producing many tasks to run, and how to run the tasks that they produce so that they are consumed in a timely and efficient manner.
Produce Consume
The simplest solution to this pattern is to iteratively produce and consume as follows:
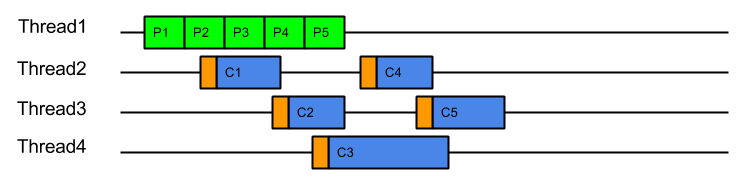
while (true)
{
    Runnable task = _producer.produce();
    if (task == null)
        break;
    task.run();
}
This strategy iteratively produces and consumes tasks in a single thread per Producer:
 It has the advantage of simplicity, but suffers the fundamental flaw of head-of-line blocking (HOL): If one of the tasks blocks or executes slowly (e.g. task C3 above), then subsequent tasks will be held up. This is actually good for a HTTP/1 connection where responses must be produced in the order of request, but is unacceptable for HTTP/2 connections where responses must be able to return in arbitrary order and one slow request cannot hold up other fast ones. It is also unacceptable for the NIO selection use-case as one slow/busy/blocked connection must not prevent other connections from being produced/consumed.
Produce Execute Consume
To solve the HOL blocking problem, multiple threads must be used so that produced tasks can be executed in parallel and even if one is slow or blocks, the other threads can progress the other tasks. The simplest application of threading is to place every task that is produced onto a queue to be consumed by an Executor:
while (true)
{
    Runnable task = _producer.produce();
    if (task == null)
        break;
    _executor.execute(task);
}
This strategy could be considered the canonical solution to the producer consumer problem, where producers are separated from consumers by a queue and is at the heart of architectures such as SEDA. This strategy solves well the head of line blocking issue, since all tasks produced can complete independently in different threads (or cached threads):
However, while it solves the HOL blocking issue, it introduces a number of other significant issues:
- Tasks are produced by one thread and then consumed by another thread. This means that tasks are consumed on CPU cores with cold caches and that extra CPU time is required (indicated above in orange) while the cache loads the task related data. For example, when producing a HTTP request, the parser will identify the request method, URI and fields, which will be in the CPU’s cache. If the request is consumed by a different thread, then all the request data must be loaded into the new CPU cache. This is an aspect of Parallel Slowdown which Jetty has needed to avoid previously as it can cause a considerable impact on the server throughput.
- Slow consumers may cause an arbitrarily large queue of tasks to build up as the producers may just keep adding to the queue faster than tasks can be consumed. This means that no back pressure is given to the production of tasks and out of memory problems can result. Conversely, if the queue size is limited with a blocking queue, then HOL blocking problems can re-emerge as producers are prevented for queuing tasks that could be executed.
- Every task produced will experience a dispatch latency as it is passed to a new thread to be consumed. While extra latency does not necessarily reduce the throughput of the server, it can represent a reduction in the quality of service. The diagram above shows the total 5 tasks completing sooner than ProduceConsume, but if the server was busy then tasks may need to wait some time in the queue before being allocated a thread.
- Another aspect of parallel slowdown is the contention between related tasks which a single producer may produce. For example a single HTTP/2 connection is likely to produce requests for the same client session, accessing the same user data. If multiple requests from the same connection are executed in parallel on different CPU cores, then they may contend for the same application locks and data and therefore be less efficient. Another way to think about this is that if a 4 core machine is handling 8 connections that each produce 4 requests, then each core will handle 8 requests. If each core can handle 4 requests from each of 2 connections then there will be no contention between cores. However, if each core handles 1 requests from each of 8 connections, then the chances of contention will be high. It is far better for total throughput for a single connections load to not be spread over all the systems cores.
Thus the ProduceExecuteConsume strategy has solved the HOL blocking concern but at the expense of very poor performance on both latency (dispatch times) and execution (cold caches), as well as introducing concerns of contention and back pressure. Many of these additional concerns involve the concept of Mechanical Sympathy, where the underlying mechanical design (i.e. CPU cores and caches) must be considered when designing scalable software.
How Bad Is It?
Pretty Bad! We have written a benchmark project that compares the Produce Consume and Produce Execute Consume strategies (both described above). The Test Connection used simulates a typical HTTP request handling load where the production of the task equates to parsing the request and created the request object and the consumption of the task equates to handling the request and generating a response.
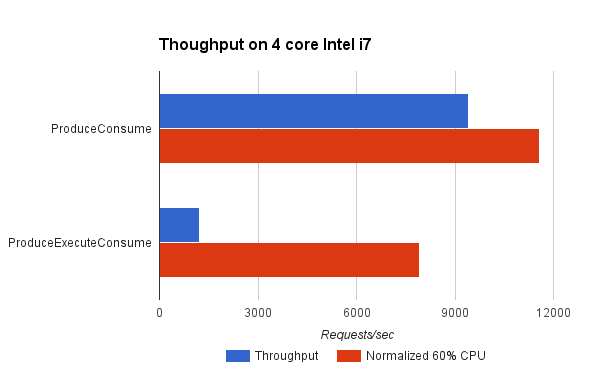
It can be seen that the ProduceConsume strategy achieves almost 8 times the throughput of the ProduceExecuteConsume strategy. However in doing so, the ProduceExecuteConsume strategy is using a lot less CPU (probably because it is idle during the dispatch delays). Yet even when the throughput is normalised to what might be achieved if 60% of the available CPU was used, then this strategy reduces throughput by 30%! This is most probably due to the processing inefficiencies of cold caches and contention between tasks in the ProduceExecuteConsume strategy. This clearly shows that to avoid HOL blocking, the ProduceExecuteConsume strategy is giving up significant throughput when you consider either achieved or theoretical measures.
What Can Be Done?
Disruptor ?
Consideration of the SEDA architecture led to the development of the Disruptor pattern, which self describes as a “High performance alternative to bounded queues for exchanging data between concurrent threads”. This pattern attacks the problem by replacing the queue between producer and consumer with a better data structure that can greatly improve the handing off of tasks between threads by considering the mechanical sympathetic concerns that affect the queue data structure itself.
While replacing the queue with a better mechanism may well greatly improve performance, our analysis was that it in Jetty it was the parallel slowdown of sharing the task data between threads that dominated any issues with the queue mechanism itself. Furthermore, the problem domain of a full SEDA-like architecture, whilst similar to the Jetty use-cases is not similar enough to take advantage of some of the more advanced semantics available with the disruptor.
Even with the most efficient queue replacement, the Jetty use-cases will suffer from some dispatch latency and parallel slow down from cold caches and contending related tasks.
Work Stealing ?
Another technique for avoiding parallel slowdown is a Work Stealing scheduling strategy:
In a work stealing scheduler, each processor in a computer system has a queue of work items to perform…. New items are initially put on the queue of the processor executing the work item. When a processor runs out of work, it looks at the queues of other processors and “steals” their work items.
This concept initially looked very promising as it appear that it would allow related tasks to stay on the same CPU core and avoid the parallel slowdown issues described above.
It would require the single task queue to be broken up in to multiple queues, but there are suitable candidates for finer granularity queues available (e.g. the connection).Unfortunately, several efforts to implement it within Jetty failed to find an elegant solution because it is not generally possible to stick a queue or thread to a processor and the interaction of task queues vs thread pool queues added an additional level of complexity. More over, because the approach still involves queues it does not solve the back pressure issues and the execution of tasks in a queue may flush the cache between production and consumption.
However consideration of the principles of Work Stealing inspired the creation of a new scheduling strategy that attempt to achieve the same result but without any queues.
Eat What You Kill!
The “Eat What You Kill”[n]The EatWhatYouKill strategy is named after a hunting proverb in the sense that one should only kill to eat. The use of this phrase is not an endorsement of hunting nor killing of wildlife for food or sport.[/n] strategy (which could have been more prosaicly named ExecuteProduceConsume) has been designed to get the best of both worlds of the strategies presented above. It is nick named after the hunting movement that says a hunter should only kill an animal they intend to eat. Applied to the producer consumer problem this policy says that a thread must only produce (kill) a task if it intends to consume (eat) it immediately. However, unlike the ProduceConsume strategy that adheres to this principle, EatWhatYouKill still performs dispatches, but only to recruit new threads (hunters) to produce and consume more tasks while the current thread is busy eating !
private volatile boolean _threadPending;
private AtomicBoolean _producing = new AtomicBoolean(false);
...
    _threadPending = false;
    while (true)
    {
        if (!_producing.compareAndSet(false, true))
            break;
        Runnable task;
        try
        {
            task = _producer.produce();
        }
        finally
        {
            _producing.set(false);
        }
        if (task == null)
          break;
        if (!_threadPending)
        {
            _threadPending = true;
            _executor.execute(this);
        }

        task.run();
    }
This strategy can still operate like ProduceConsume using a loop to produce and consume tasks with a hot cache. A dispatch is performed to recruit a new thread to produce and consume, but on a busy server where the delay in dispatching a new thread may be large, the extra thread may arrive after all the work is done. Thus the extreme case on a busy server is that this strategy can behave like ProduceConsume with an extra noop dispatch:

Serial queueless execution like this is optimal for a servers throughput: There is not queue of produced tasks wasting memory, as tasks are only produced when needed; tasks are always consumed with hot caches immediately after production. Ideally each core and/or thread in a server is serially executing related tasks in this pattern… unless of course one tasks takes too long to execute and we need to avoid HOL blocking.
EatWhatYouKill avoids HOL blocking as it is able to recruit additional threads to iterate on production and consumption if the server is less busy and the dispatch delay is less than the time needed to consume a task. In such cases, a new threads will be recruited to assist with producing and consuming, but each thread will consume what they produced using a hot cache and tasks can complete out of order:
 On a mostly idle server, the dispatch delay may always be less than the time to consume a task and thus every task may be produced and consumed in its own dispatched thread:
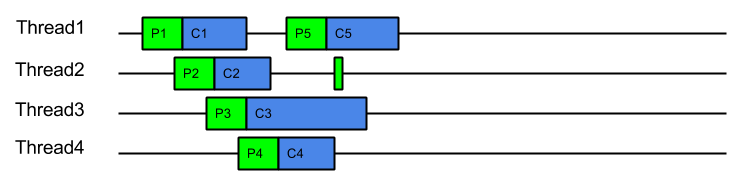 In this idle case there is a dispatch for every task, which is exactly the same dispatch cost of ProduceExecuteConsume. However this is only the worst case dispatch overhead for EatWhatYouKill and only happens on a mostly idle server, which has spare CPU. Even with the worst case dispatch case, EatWahtYouKill still has the advantage of always consuming with a hot cache.
An alternate way to visualise this strategy is to consider it like ProduceConsume, but that it dispatches extra threads to work steal production and consumption. These work stealing threads will only manage to steal work if the server is has spare capacity and the consumption of a task is risking HOL blocking.
This strategy has many benefits:
- A hot cache is always used to consume a produced task.
- Good back pressure is achieved by making production contingent on either another thread being available or prior consumption being completed.
- There will only ever be one outstanding dispatch to the thread pool per producer which reduces contention on the thread pool queue.
- Unlike ProduceExecuteConsume, which always incurs the cost of a dispatch for every task produced, ExecuteProduceConsume will only dispatch additional threads if the time to consume exceeds the time to dispatch.
- On systems where the dispatch delay is of the same order of magnitude as consuming a task (which is likely as the dispatch delay is often comprised of the wait for previous tasks to complete), then this strategy is self balancing and will find an optimal number of threads.
- While contention between related tasks can still occur, it will be less of a problem on busy servers because related task will tend to be consumed iteratively, unless one of them blocks or executes slowly.
How Good Is It ?
Indications from the benchmarks is that it is very good !
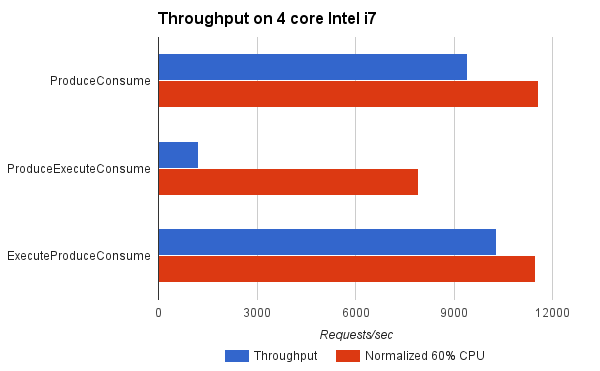
For the benchmark, ExecuteProduceConsume achieved better throughput than ProduceConsume because it was able to use more CPU cores when appropriate. When normalised for CPU load, it achieved near identical results to ProduceConsume, which is to be expected since both consume tasks with hot caches and ExecuteProduceConsume only incurs in dispatch costs when they are productive.
This indicates that you can kill your cake and eat it too! The same efficiency of ProduceConsume can be achieved with the same HOL blocking prevention of ProduceExecuteConsume.
Conclusion
The EatWhatYouKill (aka ExecuteProduceConsume) strategy has been integrated into Jetty-9.3 for both NIO selection and HTTP/2 request handling. This makes it possible for the following sequence of events to occur within a single thread of execution:
- A selector thread T1 wakes up because it has detected IO activity.
- (T1) An ExecuteProduceConsume strategy processes the selected keys set.
- (T1) An EndPoint with input pending is produced from the selected keys set.
- Another thread T2 is dispatched to continue producing from the selected keys set.
- (T1) The EndPoint with input pending is consumed by running the HTTP/2 connection associated with it.
- (T1) An ExecuteProduceConsume strategy processes the I/O for the HTTP/2 connection.
- (T1) A HTTP/2 frame is produced by the HTTP/2 connection.
- Another thread T3 is dispatched to continue producing HTTP/2 frames from the HTTP/2 connection.
- (T1) The frame is consumed by possibly invoking the application to produce a response.
- (T1) The thread returns from the application and attempts to produce more frames from the HTTP/2 connection, if there is I/O left to process.
- (T1) The thread returns from HTTP/2 connection I/O processing and attempts to produce more EndPoints from the selected keys set, if there is any left.
This allows a single thread with hot cache to handle a request from I/O selection, through frame parsing to response generation with no queues or dispatch delays. This offers maximum efficiency of handling while avoiding the unacceptable HOL blocking.
Early indications are that Jetty-9.3 is indeed demonstrating a significant step forward in both low latency and high throughput. This site has been running on EWYK Jetty-9.3 for some months. We are confident that with this new execution strategy, Jetty will provide the most performant and scalable HTTP/2 implementation available in Java.
- a NIO
-
Jetty @ JavaOne 2014
I’ll be attending JavaOne Sept 29 to Oct 1 and will be presenting several talks on Jetty:
- CON2236 Servlet Async IO: I’ll be looking at the servlet 3.1 asynchronous IO API and how to use it for scale and low latency. Also covers a little bit about how we are using it with http2. There is an introduction video but the talk will be a lot more detailed and hopefully interesting.
- BOF2237 Jetty Features: This will be a free form two way discussion about new features in jetty and it’s future direction: http2, modules, admin consoles, dockers etc. are all good topics for discussion.
- CON5100 Java in the Cloud: This is primarily a Google session, but I’ve been invited to present the work we have done improving the integration of Jetty into their cloud offerings.
I’ll be in the Bay area from the 23rd and I’d be really pleased to meet up with Jetty users in the area before or during the conference for anything from an informal chat/drink/coffee up to the full sales pitch of Intalio|Webtide services – or even both!) – <gregw@intalio.com>
- CON2236 Servlet Async IO: I’ll be looking at the servlet 3.1 asynchronous IO API and how to use it for scale and low latency. Also covers a little bit about how we are using it with http2. There is an introduction video but the talk will be a lot more detailed and hopefully interesting.
-
Jetty 9 Quick Start
The auto discovery features of the Servlet specification can make deployments slow and uncertain. Working in collaboration with Google AppEngine, the Jetty team has developed the Jetty quick start mechanism that allows rapid and consistent starting of a Servlet server. Google AppEngine has long used Jetty for it’s footprint and flexibility, and now fast and predictable starting is a new compelling reason to use jetty in the cloud. As Google App Engine is specifically designed with highly variable, bursty workloads in mind – rapid start up time leads directly to cost-efficient scaling.
Servlet Container Discovery Features
The last few iterations of the Servlet 3.x specification have added a lot of features related to making development easier by auto discovery and configuration of Servlets, Filters and frameworks:
Discover / From: Selected
Container
JarsWEB-INF/
classes/
*WEB-INF/
lib/
*.jarAnnotated Servlets & Filters Y Y Y web.xml fragments Y Y ServletContainerInitializers Y Y Classes discoverd by HandlesTypes Y Y Y JSP Taglib descriptors Y Y Slow Discovery
Auto discovery of Servlet configuration can be useful during the development of a webapp as it allows new features and frameworks to be enabled simply by dropping in a jar file. However, for deployment, the need to scan the contents of many jars can have a significant impact of the start time of a webapp. In the cloud, where server instances are often spun up on demand, having a slow start time can have a big impact on the resources needed.
Consider a cluster under load that determines that an extra node is desirable, then every second the new node spends scanning its own classpath for configuration is a second that the entire cluster is overloaded and giving less than optimal performance. To counter the inability to quickly bring on new instances, cluster administrators have to provision more idle capacity that can handle a burst in load while more capacity is brought on line. This extra idle capacity is carried for all time while the application is running and thus a slowly starting server increases costs over the whole application deployment.
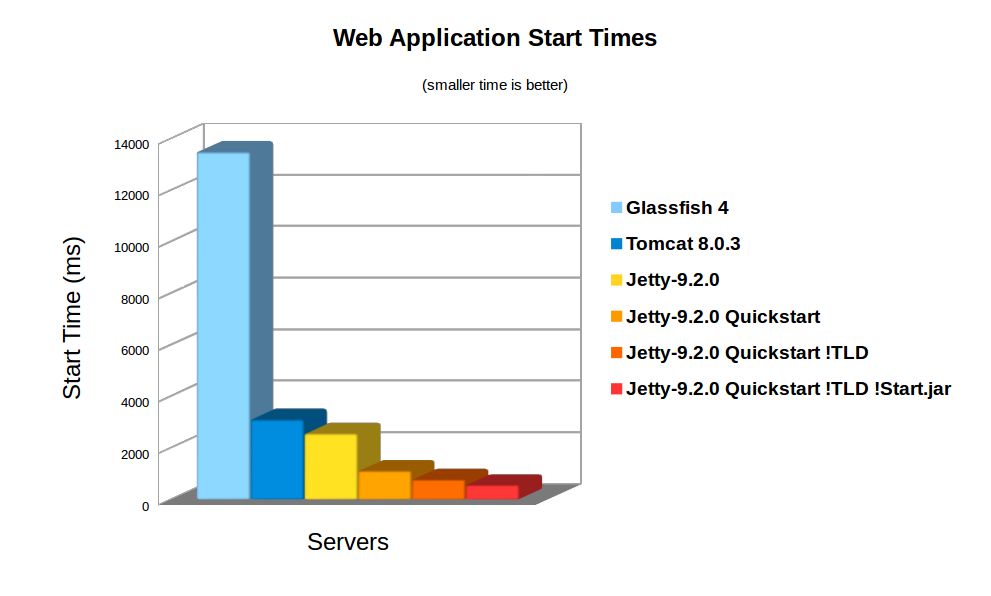
On average server hardware, a moderate webapp with 36 jars (using spring, jersey & jackson) took over 3,158ms to deploy on Jetty 9. Now this is pretty fast and some Servlet containers (eg Glassfish) take more time to initialise their logging. However 3s is still over a reasonable thresh hold for making a user wait whilst dynamically starting an instance. Also many webapps now have over 100 jar dependencies, so scanning time can be a lot longer.
Using the standard meta-data complete option does not significantly speed up start times, as TLDs and HandlersTypes classes still must be discovered even with meta data complete. Unpacking the war file saves a little more time, but even with both of these, Jetty still takes 2,747ms to start.
Unknown Deployment
Another issue with discovery is that the exact configuration of the a webapp is not fully known until runtime. New Servlets and frameworks can be accidentally deployed if jar files are upgraded without their contents being fully investigated. This give some deployers a large headache with regards to security audits and just general predictability.
It is possible to disable some auto discovery mechanisms by using the meta-data-complete setting within web.xml, however that does not disable the scanning of HandlesTypes so it does not avoid the need to scan, nor avoid auto deployment of accidentally included types and annotations.
Jetty 9 Quickstart
From release 9.2.0 of Jetty, we have included the quickstart module that allows a webapp to be pre-scanned and preconfigured. This means that all the scanning is done prior to deployment and all configuration is encoded into an effective web.xml, called WEB-INF/quickstart-web.xml, which can be inspected to understand what will be deployed before deploying.
Not only does the quickstart-web.xml contain all the discovered Servlets, Filters and Constraints, but it also encodes as context parameters all discovered:
- ServletContainerInitializers
- HandlesTypes classes
- Taglib Descriptors
With the quickstart mechanism, jetty is able to entirely bypass all scanning and discovery modes and start a webapp in a predictable and fast way.
Using Quickstart
To prepare a jetty instance for testing the quickstart mechanism is extremely simple using the jetty module system. Firstly, if JETTY_HOME is pointing to a jetty distribution >= 9.2.0, then we can prepare a Jetty instance for a normal deployment of our benchmark webapp:
> JETTY_HOME=/opt/jetty-9.2.0.v20140526
> mkdir /tmp/demo
> cd /tmp/demo
> java -jar $JETTY_HOME/start.jar
  --add-to-startd=http,annotations,plus,jsp,deploy
> cp /tmp/benchmark.war webapps/
and we can see how long this takes to start normally:
> java -jar $JETTY_HOME/start.jar
2014-03-19 15:11:18.826:INFO::main: Logging initialized @255ms
2014-03-19 15:11:19.020:INFO:oejs.Server:main: jetty-9.2.0.v20140526
2014-03-19 15:11:19.036:INFO:oejdp.ScanningAppProvider:main: Deployment monitor [file:/tmp/demo/webapps/] at interval 1
2014-03-19 15:11:21.708:INFO:oejsh.ContextHandler:main: Started o.e.j.w.WebAppContext@633a6671{/benchmark,file:/tmp/jetty-0.0.0.0-8080-benchmark.war-_benchmark-any-8166385366934676785.dir/webapp/,AVAILABLE}{/benchmark.war}
2014-03-19 15:11:21.718:INFO:oejs.ServerConnector:main: Started ServerConnector@21fd3544{HTTP/1.1}{0.0.0.0:8080}
2014-03-19 15:11:21.718:INFO:oejs.Server:main: Started @2579ms
So the JVM started and loaded the core of jetty in 255ms, but another 2324 ms were needed to scan and start the webapp.
To quick start this webapp, we need to enable the quickstart module and use an example context xml file to configure the benchmark webapp to use it:
> java -jar $JETTY_HOME/start.jar --add-to-startd=quickstart
> cp $JETTY_HOME/etc/example-quickstart.xml webapps/benchmark.xml
> vi webapps/benchmark.xml
The benchmark.xml file should be edited to point to the benchmark.war file:
<?xml version="1.0"  encoding="ISO-8859-1"?>
<!DOCTYPE Configure PUBLIC "-//Jetty//Configure//EN" "http://www.eclipse.org/jetty/configure_9_0.dtd">
<Configure class="org.eclipse.jetty.quickstart.QuickStartWebApp">
  <Set name="autoPreconfigure">true</Set>
  <Set name="contextPath">/benchmark</Set>
  <Set name="war"><Property name="jetty.webapps" default="."/>/benchmark.war</Set>
</Configure>
Now the next time the webapp is run, it will be preconfigured (taking a little bit longer than normal start):
> java -jar $JETTY_HOME/start.jar
2014-03-19 15:21:16.442:INFO::main: Logging initialized @237ms
2014-03-19 15:21:16.624:INFO:oejs.Server:main: jetty-9.2.0.v20140526
2014-03-19 15:21:16.642:INFO:oejdp.ScanningAppProvider:main: Deployment monitor [file:/tmp/demo/webapps/] at interval 1
2014-03-19 15:21:16.688:INFO:oejq.QuickStartWebApp:main: Quickstart Extract file:/tmp/demo/webapps/benchmark.war to file:/tmp/demo/webapps/benchmark
2014-03-19 15:21:16.733:INFO:oejq.QuickStartWebApp:main: Quickstart preconfigure: o.e.j.q.QuickStartWebApp@54318a7a{/benchmark,file:/tmp/demo/webapps/benchmark,null}(war=file:/tmp/demo/webapps/benchmark.war,dir=file:/tmp/demo/webapps/benchmark)
2014-03-19 15:21:19.545:INFO:oejq.QuickStartWebApp:main: Quickstart generate /tmp/demo/webapps/benchmark/WEB-INF/quickstart-web.xml
2014-03-19 15:21:19.879:INFO:oejsh.ContextHandler:main: Started o.e.j.q.QuickStartWebApp@54318a7a{/benchmark,file:/tmp/demo/webapps/benchmark,AVAILABLE}
2014-03-19 15:21:19.893:INFO:oejs.ServerConnector:main: Started ServerConnector@63acac21{HTTP/1.1}{0.0.0.0:8080}
2014-03-19 15:21:19.894:INFO:oejs.Server:main: Started @3698ms
After preconfiguration, on all subsequent starts it will be quick started:
> java -jar $JETTY_HOME/start.jar
2014-03-19 15:21:26.069:INFO::main: Logging initialized @239ms
2014-03-19 15:21:26.263:INFO:oejs.Server:main: jetty-9.2.0-SNAPSHOT
2014-03-19 15:21:26.281:INFO:oejdp.ScanningAppProvider:main: Deployment monitor [file:/tmp/demo/webapps/] at interval 1
2014-03-19 15:21:26.941:INFO:oejsh.ContextHandler:main: Started o.e.j.q.QuickStartWebApp@559d6246{/benchmark,file:/tmp/demo/webapps/benchmark/,AVAILABLE}{/benchmark/}
2014-03-19 15:21:26.956:INFO:oejs.ServerConnector:main: Started ServerConnector@4a569e9b{HTTP/1.1}{0.0.0.0:8080}
2014-03-19 15:21:26.956:INFO:oejs.Server:main: Started @1135ms
So quickstart has reduced the start time from 3158ms to approx 1135ms!
More over, the entire configuration of the webapp is visible in webapps/benchmark/WEB-INF/quickstart-web.xml. This file can be examine and all the deployed elements can be easily audited.
Starting Faster!
Avoiding TLD scans
The jetty 9.2 distribution switched to using the apache Jasper JSP implementation from the glassfish JSP engine. Unfortunately this JSP implementation will always scan for TLDs, which turns out takes a significant time during startup. So we have modified the standard JSP initialisation to skip TLD parsing altogether if the JSPs have been precompiled.
To let the JSP implementation know that all JSPs have been precompiled, a context attribute needs to be set in web.xml:
<context-param> <param-name>
org.eclipse.jetty.jsp. precompiled</param-name> < param-value>true</param-value> </context-param> This is done automagically if you use the Jetty Maven JSPC plugin. Now after the first run, the webapp starts in 797ms:
> java -jar $JETTY_HOME/start.jar
2014-03-19 15:30:26.052:INFO::main: Logging initialized @239ms
2014-03-19 15:30:26.245:INFO:oejs.Server:main: jetty-9.2.0.v20140526
2014-03-19 15:30:26.260:INFO:oejdp.ScanningAppProvider:main: Deployment monitor [file:/tmp/demo/webapps/] at interval 1
2014-03-19 15:30:26.589:INFO:oejsh.ContextHandler:main: Started o.e.j.q.QuickStartWebApp@414fabe1{/benchmark,file:/tmp/demo/webapps/benchmark/,AVAILABLE}{/benchmark/}
2014-03-19 15:30:26.601:INFO:oejs.ServerConnector:main: Started ServerConnector@50473913{HTTP/1.1}{0.0.0.0:8080}
2014-03-19 15:30:26.601:INFO:oejs.Server:main: Started @797ms
Bypassing start.jar
The jetty start.jar is a very powerful and flexible mechanism for constructing a classpath and executing a configuration encoded in jetty XML format. However, this mechanism does take some time to build the classpath. The start.jar mechanism can be bypassed by using the –dry-run option to generate and reuse a complete command line to start jetty:
> RUN=$(java -jar $JETTY_HOME/start.jar --dry-run)
> eval $RUN
2014-03-19 15:53:21.252:INFO::main: Logging initialized @41ms
2014-03-19 15:53:21.428:INFO:oejs.Server:main: jetty-9.2.0.v20140526
2014-03-19 15:53:21.443:INFO:oejdp.ScanningAppProvider:main: Deployment monitor [file:/tmp/demo/webapps/] at interval 1
2014-03-19 15:53:21.761:INFO:oejsh.ContextHandler:main: Started o.e.j.q.QuickStartWebApp@7a98dcb{/benchmark,file:/tmp/demo/webapps/benchmark/,AVAILABLE}{file:/tmp/demo/webapps/benchmark/}
2014-03-19 15:53:21.775:INFO:oejs.ServerConnector:main: Started ServerConnector@66ca206e{HTTP/1.1}{0.0.0.0:8080}
2014-03-19 15:53:21.776:INFO:oejs.Server:main: Started @582ms
Classloading?
With the quickstart mechanism, the start time of the jetty server is dominated by classloading, with over 50% of the CPU being profiled within URLClassloader, and the next hot spot is 4% in XML Parsing. Thus a small gain could be made by pre-parsing the XML into byte code calls, but any more significant progress will probably need examination of the class loading mechanism itself. We have experimented with combining all classes to a single jar or a classes directory, but with no further gains.
Conclusion
The Jetty-9 quick start mechanism provides almost an order of magnitude improvement is start time. This allows fast and predictable deployment, making Jetty the ideal server to be used in dynamic clouds such as Google App Engine.
-
WordPress & Jetty: perfect fit
I posted a while back about the capability of Jetty 9.1’s
HttpClientto speak HTTP over different transports: by default HTTP, but we also provide a SPDY implementation, where the HTTP requests and responses are carried using the SPDY transport rather than the HTTP transport.
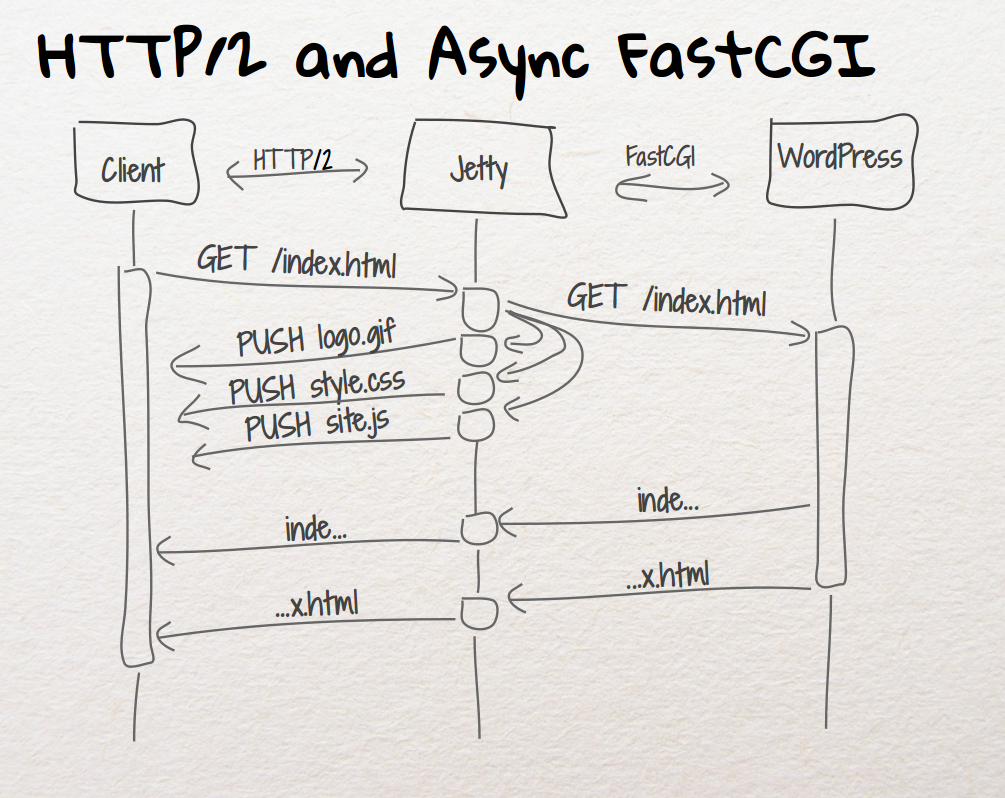
Another transport that is able to carry HTTP requests and responses is FastCGI.
The neat feature about FastCGI is that it is the default way to deploy PHP applications: fire up a proxy server (usually Apache or Nginx) in the front and proxy requests/responses to the FastCGI server (usually the PHP FastCGI Process Manager, orphp-fpm).
In this way you can deploy the most used PHP frameworks like WordPress, Drupal and others.
And you are not limited to PHP: FastCGI allows you to easily deploy other dynamic web languages and frameworks such as Django (Python-based), Rails (Ruby-based) and others.
We are happy to announce that Jetty 9.1 can now proxy to FastCGI, enabling deployment of PHP frameworks.
Why this is good, and how different it is from having – say – Apache or Nginx in the front instead of Jetty ?
The first and foremost reason is that Jetty is the only server that supports SPDY Push.
SPDY Push is the biggest performance improvement you can make to your website, without a single change to the application being served, be it a Java web application or WordPress.
Watch our video that shows how the SPDY Push feature that Jetty provides makes a big performance difference.
The second reason is that SPDY version 2 is being deprecated really fast in favor of SPDY version 3 or greater.
Browsers will not speak SPDY/2 anymore, basically reverting your website to HTTPS behaviour, losing all the SPDY benefits if your server does not support SPDY 3 or greater.
As of the time of this writing, only servers like Apache or Jetty implement SPDY version 3 or later of the SPDY protocol, while Nginx only implements SPDY version 2.
At the Jetty Project we like to eat our own dogfood, so the blog site you are reading is WordPress served via Jetty.
If you’re using Firefox or Chrome, just open the browser network console, and you will see something like this:

As you can see from the response headers, the response is served by Jetty (Server: Jetty(9.1.0.v20131115)) from PHP (X-Powered-By: PHP/5.5.3-1ubuntu2).
Of course, since both Jetty 9.1’s server andHttpClientare fully asynchronous, you have a very scalable solution for your PHP-enabled website: currently the JVM that runs this very website only uses 25 MiB of heap.
And of course you get all the SPDY performance improvements over HTTP, along with Jetty’s unique SPDY Push features.
This is good for cloud vendors too, since they can run Jetty and expose PHP applications with a minimal amount of resources, high scalability, and unique features like SPDY Push.
FastCGI for Jetty is sponsored by Intalio. If you are interested in knowing more about how Jetty can speed up your website or how to setup your PHP web application in Jetty, contact us or send an email to Jesse McConnell. -
Pluggable Transports for Jetty 9.1's HttpClient
In Jetty 9, the
HttpClientwas completely rewritten, as we posted a while back.
In Jetty 9.1, we took one step forward and we made Jetty’sHttpClientpolyglot. This means that now applications can use the HTTP API and semantic (“I want to GET the resource at the http://host/myresource URI”) but can now choose how this request is carried over the network.
Currently, three transports are implemented: HTTP, SPDY and FastCGI.
The usage is really simple; the following snippet shows how to setupHttpClientwith the default HTTP transport:// Default transport uses HTTP HttpClient httpClient = new HttpClient(); httpClient.start();
while the next snippet shows how to setup
HttpClientwith the SPDY transport:// Using the SPDY transport in clear text // Create the SPDYClient factory SPDYClient.Factory spdyClientFactory = new SPDYClient.Factory(); spdyClientFactory.start(); // Create the SPDYClient SPDYClient spdyClient = spdyClientFactory.newSPDYClient(SPDY.V3); // Create the HttpClient transport HttpClientTransport transport = new HttpClientTransportOverSPDY(spdyClient); // HTTP over SPDY ! HttpClient httpSPDYClient = new HttpClient(transport, null); httpSPDYClient.start(); // Send request, receive response ContentResponse response = httpSPDYClient.newRequest("http://host/path") .method("GET") .send();This last snippet allows the application to still use the HTTP API, but have the request and the response transported via SPDY, rather than HTTP.
Why this is useful ?
First of all, more and more websites are converting to SPDY because it offers performance improvements (and if you use Jetty as the server behind your website, the performance improvements can be stunning, check out this video).
This means that with a very simple change in theHttpClientconfiguration, your client application connecting to servers can benefit of the performance boost that SPDY provides.
If you are usingHttpClientfor server-to-server communication, you can use SPDY in clear text (rather than encrypted) to achieve even more efficiency because there is no encryption involved. Jetty is perfectly capable of speaking SPDY in clear text, so this could be a major performance win for your applications.
Furthermore, you can parallelize HTTP requests thanks to SPDY’s multiplexing rather than opening multiple connections, saving network resources.
I encourage you to try out these features and report your feedback here in the comments or on the Jetty mailing list. -
Jetty SPDY push improvements
After having some discussions on spdy-dev and having some experience with our current push implementation, we’ve decided to change a few things to the better.
Jetty now sends all push resources non interleaved to the client. That means that the push resources are being sent sequentially to the client one after the other.
The ReferrerPushStrategy which automatically detects which resources need to be pushed for a specific main resource. See SPDY – we push! for details. Previously we’ve just send the push resources in random order back to the client. However with the change to sequentially send the resources, it’s best to keep the order that the first browser client requested those resources. So we changed the implementation of ReferrerPushStrategy accordingly.
This all aims at improving the time needed for rendering the page in the browser by sending the data to the browser as the browser needs them. -
Jetty SPDY to HTTP Proxy
We have SPDY to SPDY and HTTP to SPDY proxy functionality implemented in Jetty for a while now.
An important and very common use case however is a SPDY to HTTP proxy. Imagine a network architecture where network components like firewalls need to inspect application layer contents. If those network components are not SPDY aware and able to read the binary protocol you need to terminate SPDY before passing the traffic through those components. Same counts for other network components like loadbalancers, etc.
Another common use case is that you might not be able to migrate your legacy application from an HTTP connector to SPDY. Maybe because you can’t use Jetty for your application or your application is not written in Java.
Quite a while ago, we’ve implemented a SPDY to HTTP proxy functionality in Jetty. We just didn’t blog about it yet. Using that proxy it’s possible to gain all the SPDY benefits where they really count…on the slow internet with high latency, while terminating SPDY on the frontend and talking plain HTTP to your backend components.
Here’s the documentation to setup a SPDY to HTTP proxy:
http://www.eclipse.org/jetty/documentation/current/spdy-configuring-proxy.html#spdy-to-http-example-config -
Jetty, SPDY, PHP and WordPress
Having discussed the business case for Jetty 9 and SPDY, this blog presents a simple tutorial for runing PHP web applications like WordPress on Jetty with SPDY.
Get Jetty
First you’ll need a distribution of Jetty, which you can download, unpack and run with the following (I use wget to download from the command line, or you can just download with a browser from here):
wget -U none http://repo1.maven.org/maven2/org/eclipse/jetty/jetty-distribution/9.0.2.v20130417/jetty-distribution-9.0.2.v20130417.zip
unzip jetty-distribution-9.0.2.v20130417.zip
cd jetty-distribution-9.0.2.v20130417
java -jar start.jar
You can point your browser at http://localhost:8080/ to verify that Jetty is running (Just ctrl-C jetty when you want to stop it).
Configure SPDY
Next you’ll need to download NPN (for SPDY protocol negotiation) from here and save in the lib directory:
wget -O lib/npn-boot-1.1.5.v20130313.jar
-U none
http://repo1.maven.org/maven2/org/mortbay/jetty/npn/npn-boot/1.1.5.v20130313/npn-boot-1.1.5.v20130313.jar
To configure SPDY create the file start.d/spdy.ini with the following content:
--exec
-Xbootclasspath/p:lib/npn-boot-1.1.5.v20130313.jar
OPTIONS=spdy
jetty.spdy.port=8443
jetty.secure.port=8443
etc/jetty-ssl.xml
etc/jetty-spdy.xml
Restart jetty (java -jar start.jar) and you can now verify that you are running SPDY by pointing a recent Chrome or Firefox browser at https://localhost:8443/. You may have to accept the security exception for the self signed certificate that is bundled with the jetty distro. FF indicates that they are using SPDY with a little green lightening symbol in the address bar.
Enable PHP
There are several ways to PHP enable Jetty, but the one I’m using for this demonstration is php-java-bridge, which you can download in a complete WAR file from here. To install and test in a context ready for wordpress:
mkdir webapps/wordpress
cd webapps/wordpress
unzip /tmp/JavaBridgeTemplate621.war
cd ../..
java -jar start.jar
You can then test that PHP is working by browsing to http://localhost:8080/wordpress/test.php and you can test that PHP is working under SPDY by browsing https://localhost:8443/wordpress/test.php.
Install WordPress
You now have a Jetty SPDY server serving PHP, so let’s install WordPress as an example of PHP webapplication. You can download WordPress from here and install it as follows:
cd webapps
rm index.php
unzip /tmp/wordpress-3.5.1.zip
cd ..
java -jar start.jar
You can browse to WordPress at http://localhost:8080/wordpress/ where you should see a screen inviting you to “Create a Configuration File”. You’ll need a MYSQL database instance to proceed and 2 screens later you are running WordPress over HTTP.
You’ll note that if you try immediately to access wordpress with SPDY, you get badly redirected back to the 8080 port with the https protocol! This is just WordPress being a bit dumb when it comes to SSL and I suggest you google WordPress SSL and have a read of some of the configuration and plugin options available. Take special note of how you can easily lock yourself out of the admin pages! Which you will do if you simply update the wordpress URL under general settings to https://localhost:8443/wordpress. You’ll also need to read up on running WordPress on non standard ports, but this is not a blog about wordpress, so I wont go into the options here, other than to say that difficulties with the next few steps are the SPDY as they are for SSL (and that the wordpress guys should really read up on using the host header)! If you want a quick demonstration, just change the home URI in general settings and you’ll be able to see the main site under SPDY at https://localhost:8443/wordpress/, but will be locked out of the admin pages.
Conclusion
That’s it! A few simple steps are all you need to run a complex PHP site under Jetty with SPDY! Of course if you want help with setting this up and tuning it, then please consider the Intalio’s migration, performance and/or production support services.